
NAS is a provision of disk space via commonly used network file sharing protocols. This disk space can be shared by many client computers using one or both of the following protocols:
-
SMB protocol is commonly used to provide shared network access to files for computers running Windows.
-
NFS protocol provides the same service to computers running many of the Unix-based operating systems, such as AIX, Linux, and Solaris.
Use the NAS screen to manage folders and network file sharing protocols and to control firewall interaction with the NAS space.
Adding a new share
To create a new share, on the main NAS screen, click the Folder link. A screen similar to the following will appear.
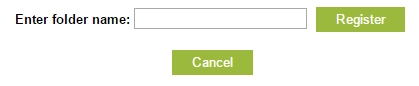
You should choose a folder name that meaningfully represents what this folder and possible subfolders will be used for. Remember that it will be possible to share this folder with one or more people on one or more client computers using one or more network file sharing protocols. An example folder name would be Staff.
In the Enter Folder Name box, type the name for the new share, and then click Register. A screen similar to the following will appear.
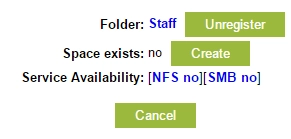
From this screen you can un-register the specified folder, create the space for the folder or delete it if it already exists, and change the folder service availability.
If space for the folder does not already exist, click Create to create the folder and move towards sharing it. The screen will then appear similar to the following.

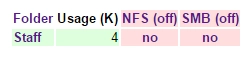
This screen gives you the additional options to delete the space that you created, check your disk usage, and change which local user or group owns the folder.
This screen also indicates the service availability of the NFS and SMB file sharing protocols for the share. In the example in the figure, the NFS no and SMB no links indicate that neither protocol is currently available. (If the respective protocols were available, the links would be labeled NFS yes and SMB yes.)
To configure the file sharing protocols and make them available:
For the SMB protocol (for computers running Microsoft Windows), continue with the next section, see SMB Protocol.
For the NFS protocol (for computers running Unix-based operating systems, such as AIX, Linux, and Solaris); see Enabling NFS Protocol.
SMB protocol
This section documents SMB protocol, which is commonly used to provide shared network access to files for computers running Microsoft Windows.
Enabling SMB protocol
The first task for using the SMB protocol is to enable the protocol on appliance. This task also includes configuring global SMB protocol settings and creating SMB users.
When you enable or disable the SMB protocol, the setting will apply immediately, as well as whenever the appliance starts up, until you change the setting.
To enable SMB protocol on appliance, on the main NAS setup screen, click SMB (on) (the links indicate the current status):

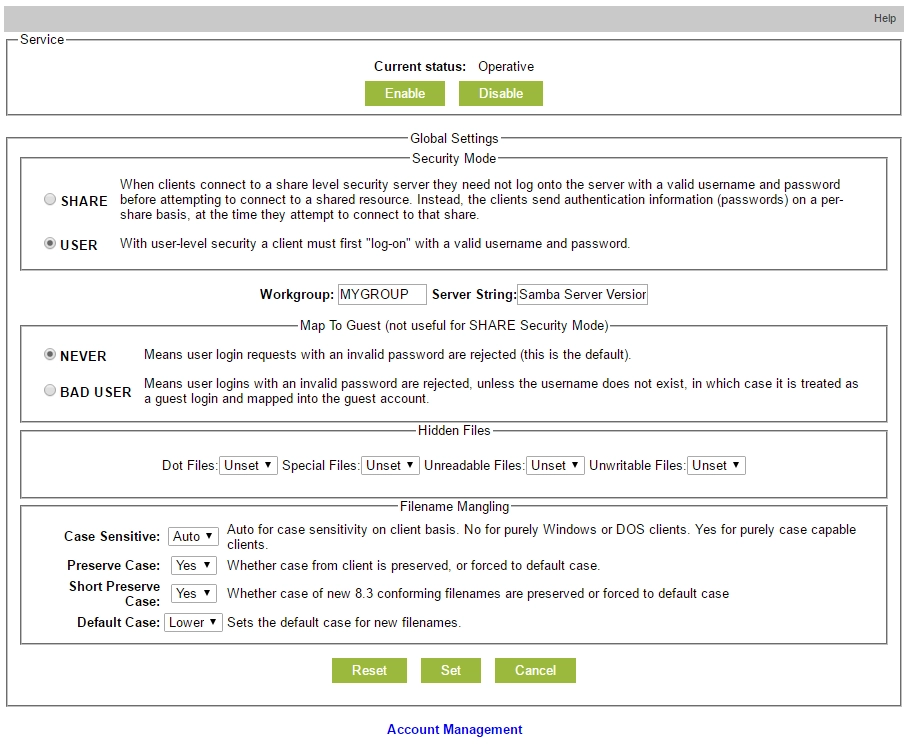
At the top of the screen, under Current Status, click Enable to enable SMB protocol. (Or, if SMB is already enabled, click Disable to disable the protocol.) The browser will then return to the previous screen.
You can use the Global Settings panel on this screen to configure the overall service behavior for any folders shared via SMB in the global settings. The settings are in five categories:
| Settings | Description |
|---|---|
| Security Mode | Use to specify if the users need to log on to the server to connect to the share |
| Workgroup/Server String | Use to specify the workgroup that appliance should log in to, as well as what will be displayed to users in addition to the appliance name |
| Map to Guest | Use to allow guest logins |
| Hidden Files | Use to configure what file types, if any, will be hidden files that will not normally be seen on the remote clients. For each file type listed, you can use the drop-down list to select Unset, Hide, or Show. |
| Filename Mangling | Use to configure file name case and format settings |
To save your global settings, click Set.
This screen also includes an Account Management link at the bottom for creating and managing SMB users.
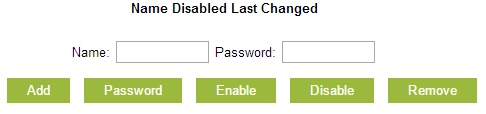
There are no predefined users. You can use the following buttons on the screen to create a new user, or manage existing users (select users by checking the respective checkboxes):
| Button name | Button description |
|---|---|
| Add | Add new account with the specified name (minimum three characters) and password (minimum four characters) |
| Password | Change password for the selected users |
| Enable | Enable selected users |
| Disable | Disable the selected users |
| Remove | Remove the selected users |
When you have finished managing users, close the screen.
Making SMB available on a folder
To make SMB protocol available on the folder, either:
-
On the main NAS setup screen, click no in the SMB column for the respective folder, or
-
On the disk share configuration screen (see Adding a new share), in the Service Available row, click SMB no.
Remember, no indicates the current status of the folder (before you make these changes).
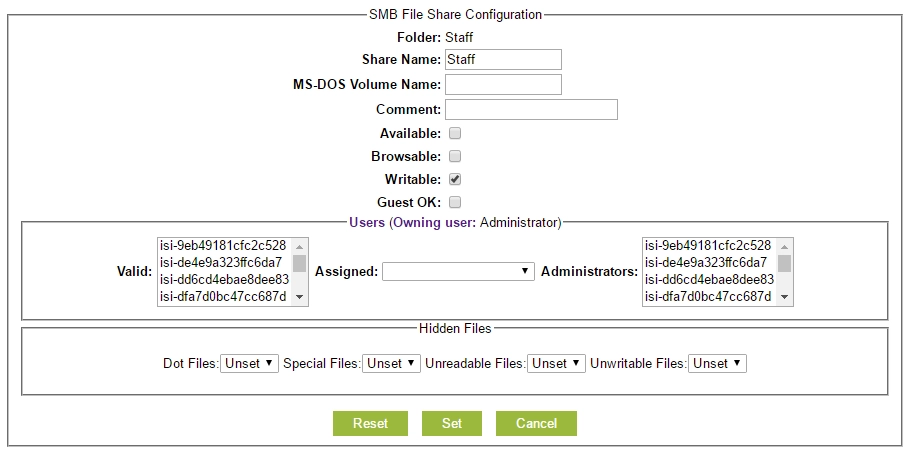
From this screen, you can configure various remote access capabilities specific to the named folder.
For security purposes, new folders are created with no access rights. You will need to enable various configuration settings in order for the folder to actually be usable.
| Option | Description |
|---|---|
| Folder | The folder for sharing. You cannot edit this setting here. |
| Share Name | The share name, which defaults to the share name. Share names should be 12 characters or less. |
| MS‑DOS Volume Name | The MS‑DOS volume name for the share |
| Comment | Arbitrary notes regarding the share |
| Available | When selected, allows access to the folder. This setting is configurable if you need to quickly disable that folder availability without necessarily removing the folder or disabling the SMB protocol service. If Available is selected, determines if SMB protocol is listed as available (yes) or not (no) on the main NAS screen and other related screens. |
| Browsable | When selected, allows the folder to be browsed |
| Writable | When selected, allows the folder to be written to (although at first you may want to leave the checkbox clear in order for the folder to be read-only) |
| Guest OK | When selected, allows guest access to the folder |
Next, use the Users section of the screen to configure what authenticated users can do with the folder (please refer to the screenshot above).
This screen lists the defined SMB users from whom you can configure the users for the share, using the Valid, Assigned, and Administrators options:
-
In the Valid selection list, select one or more users who will then all be able to access the folder share.
To select multiple users, hold down Ctrl while you click individual users.
-
Use the Assigned drop-down list to select which user (if any) to assign as the owner of files created by valid users.
If no user is selected as owner, users will own their own files.
Valid users who are not assigned as owners will not be able to make any changes to this top level folder, but only to any subfolders that the valid user does own. To change this, click Owning User, and then on the disk share configuration screen (see Adding a new share), change the local user to match the valid user. (Be sure to click Change User so that the change will take effect.)
-
Use the Administrators selection list to select one or more users as administrators.
You can use the Hidden Files section to configure what file types, if any, will be hidden files that will not normally be seen on the remote clients. For each file type listed, you can use the drop-down list to select Unset, Hide, or Show.
-
To save these new configuration settings and return to the main NAS screen, click Set.
NFS protocol
This section documents NFS protocol, which is commonly used to provide shared network access to files for computers running many of the Unix-based operating systems, such as AIX, Linux, and Solaris.
Enabling NFS protocol
The first task for using the NFS protocol is to enable the protocol on appliance. This task also includes configuring NFS clients.
When you enable or disable the NFS protocol, the setting will apply immediately, as well as whenever the appliance starts up, until you change the setting.
To enable NFS protocol on appliance, on the main NAS setup screen, click NFS (off) (the links indicate the current status):

To enable NFS protocol, click Enable. (Or, if NFS is already enabled, click Disable to disable the protocol.) The browser will then return to the previous screen.
Making NFS available on a folder
To make NFS protocol available on a folder, either:
-
On the main NAS setup screen, click no in the NFS column for the respective folder, or
-
On the disk share configuration screen (see Adding a new share), in the Service Available row, click NFS no.
Remember, no indicates the current status of the folder (before you make these changes).
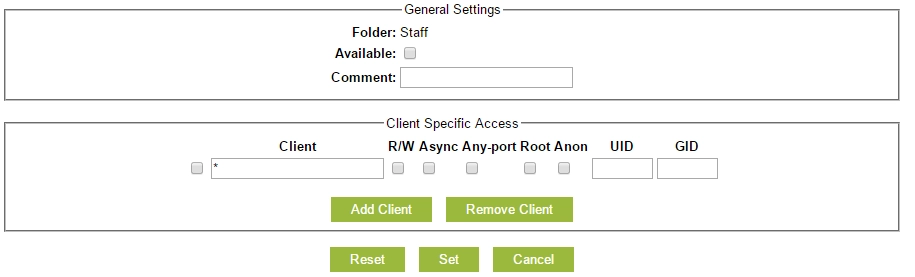
In the General Settings group, select Available to allow access to the folder. You can also enter arbitrary folder notes in the Comment box.
In the Client Specific Access group, you can make the following settings for the folder.
| Setting | Description |
|---|---|
| Client | The client that the setting applies to. You can use asterisks (*) as wildcard characters to match the setting to multiple clients. |
| R/W | When checked, enables write access as well as read access to the client for the export |
| Async | When checked, improves performance at the cost of possible data loss or corruption on unclean server restarts |
| Any‑port | When checked, allows NFS requests from any Internet port number—not just less than 1024 |
| Root | When checked, allows remote superuser |
| Anon | When checked, treats all users anonymously |
| UID | When Anon is checked, user ID for the anonymous user |
| GID | When Anon is checked, group ID for the anonymous user |
To add additional client lines to the table, click Add Client. Or, to remove the selected (checked) client lines, click Remove Client.
To save these new configuration settings and return to the main NAS screen, click Set.