
Introduction
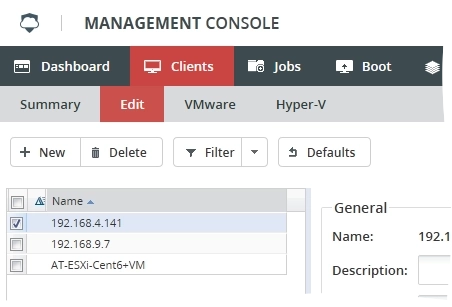
When you click the Edit subtab, the screen displays the interface for editing client configurations.
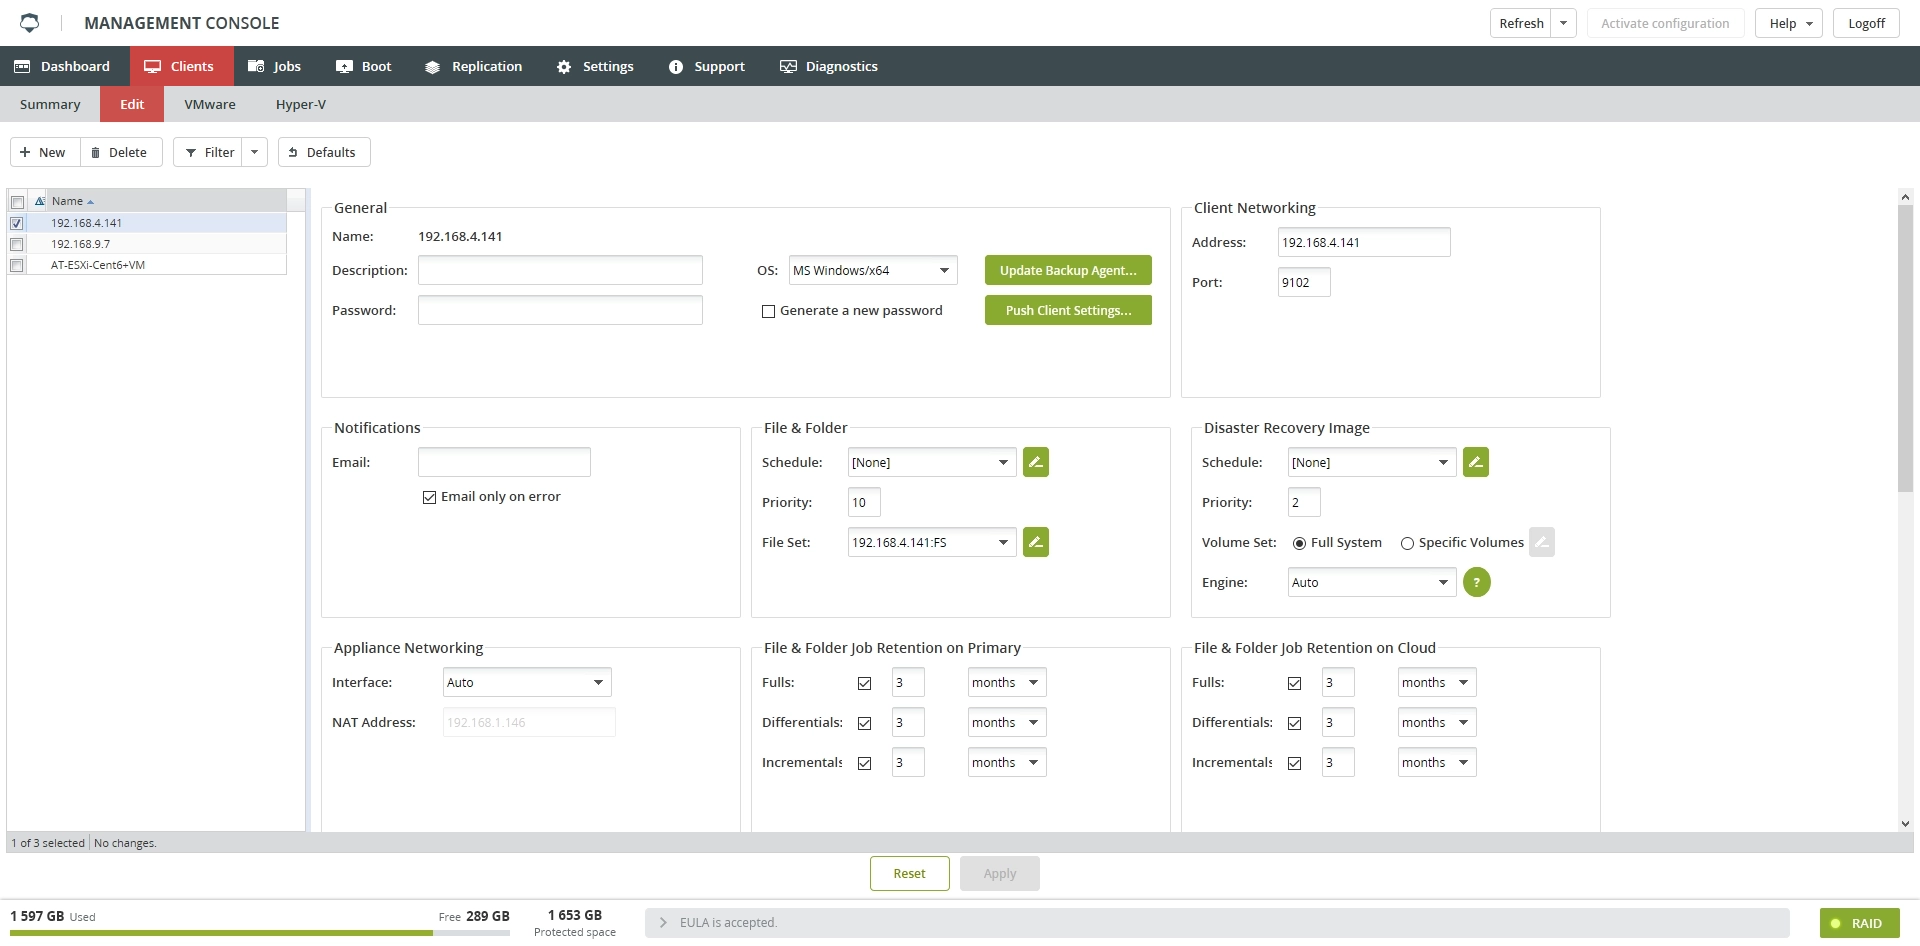
All of the clients on the system (except for Myself) are listed in the left column.
You can use the options on the Edit Clients line to:
create a client for the backed up machine,
delete a client for the backed up machine,
filter the list of clients, and
view and change the default client configuration settings.

Create client
On the actions toolbar, click New.
The New Client dialog opens.
In the New Client dialog, configure settings for the new client.
Setting Description Name Name of the client. You cannot change it after the client is created. Description Optional description of the client Operating System Operating system installed on the host Set as defaults OS Make the selected operating system default when creating clients Address IP address or DNS name of the backed host DR schedule Schedule for DR image backup File & Folder Schedule Schedule for file and folder backup 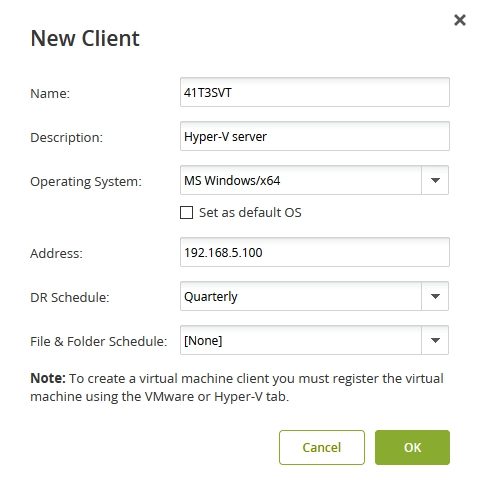
Click OK to create client, and wait for the process to complete.
Click Activate configuration to apply changes.

Delete client
To delete one or more client configurations, select the checkboxes for the respective clients, and then click Delete on the toolbar.
Then, on the Confirm Client Delete dialog box, to purge the client backup data, choose to purge the associated jobs from that client or not.
If you do not purge the backup data with the client, there will be orphaned jobs left on the appliance. Without a client to refer to, the appliance will never know when to delete this information, as retention settings (recycling) is set at the client level. Therefore, the data will remain indefinitely.
File sets
Appliance determines which files to backup using a file set for each client. Each file set has a number of attributes, which allow you to specify how the set is handled.
The first time you click the Edit subtab on a new installation, no clients will be listed. (See Create client configuration.)
When clients are listed on the screen, you can use the checkboxes to select one or more. If you select multiple clients, all settings that the clients have in common will be displayed. Any settings that are different among the selected clients (including checkboxes) will be displayed with angle brackets (< >). When you save any changes that you make, only new settings will be modified for the selected clients.
When you edit any setting on the screen, a blue triangle (![]() ) will appear next to the changed setting, indicating that a change (delta) has occurred.
) will appear next to the changed setting, indicating that a change (delta) has occurred.
After you complete any configuration changes, click Apply to apply your settings, or click Reset to return to the original. Also, Activate Configuration to confirm all changes made.
The settings on the screen are documented in the following sections.
Clients can share defined file sets. (See Shared File Sets subtab.)
General settings
Name
The Name setting corresponds to the name of the client. The name is set when you create the client; you cannot change it.
Description
The Description setting is optional, and can be used to help further identify the client. Client descriptions can include any character except double-quotes (").
Password
The system-generated client password is used to authenticate the appliance and the client software installed on each client. This password will be entered automatically into the client configuration file. Each client uses its client password to authenticate the appliance each time a backup or restore is performed.
If you check the Auto Generate Password checkbox, when you save the client, the current password will be discarded and replaced with a random password string. Be sure to update the agent with the new password if it has been changed on the client.
Client networking settings
The Client Networking pane has two settings:
The Address setting should be either the client IP address or the client DNS name. The default setting is the value used for the Name field. If the Name value is not a valid DNS name, enter a valid DNS name or an IP address into the Address field.
The Port setting is the TCP port that the appliance uses to communicate with the client. Normally you do not need to change this port; but, if you want to run multiple agents with different privilege levels on the same client, each agent will require a different port setting. The default value is
9102.
Notification settings
You can set up emails to be sent to you in System › System Alerts for all clients on the appliance. It is recommended that you use this area only if there is another contact, besides this global recipient for this specific client.
If you want the contact to receive emails about all backup activity, type your email address in the Email box. If you want this contact to receive the emails only when errors occur, check the Email only on error checkbox.
You can include multiple addresses separated with commas.
Backup settings
The Backup pane has three settings: Schedule, Priority, and File Set.
Schedule
The Schedule setting specifies when backups will run for the client, and at what backup level (full, differential, or incremental). There are four predefined schedules. You can edit these default schedules or add your own schedules. (See Schedules subtab.)
| Schedule | Description |
|---|---|
| Quarterly | Performs a full backup on the first day of January, April, July, and October; a differential backup on the first day of every other month; an incremental backup on all other days |
| Monthly | Performs a full backup on the first Sunday of every month; a differential backup on each subsequent Sunday of the month; an incremental backup on all other days |
| Weekly | Performs a full backup on every Sunday; an incremental backup on every other day of the week |
| Daily | Performs a full backup every day 1 |
You can also set Schedule to None, meaning to never automatically back up the client. You can then back up the client manually at any time. This is useful for computers, such as laptops, whose presence on the network is not guaranteed. For information on performing manual backups, see Manual Backup.
The backup levels (full, differential, and incremental) are summarized in the following table.
| Level | Description |
|---|---|
| Full | Saves all files specified for the client, if the files have been modified since the last backup or not |
| Differential | Saves all files that have been modified since the last successful full backup |
| Incremental | Saves any file that has changed since any previous successful backup of that file |
For more information on backup levels, see Backup Level Considerations.
Priority
The priority of this client configuration relative to other client configurations when the backup system is processing multiple client configuration jobs concurrently. The priority can range from 1 to 999; lower-numbered priority jobs are performed first.
Job priorities 1 to 500 are nonexclusive—jobs will be submitted in priority order and will run concurrently, up to the number allowed by the Maximum Concurrent Jobs setting.
Job priorities 501 to 999 are exclusive—no jobs of priority 501 to 999 will run until all jobs of less than priority 501 are done. For priorities in the range 501 to 999, only jobs of exactly the same priority will run, unless a job in the priority range 1 to 500 is executed while a job in the range 501 to 999 is already running.
File set
The File Set setting specifies what directories or files to back up. Each file set has a name and is defined for a specific operating system. The default file set for your client depends on the operating system. For example, by default, Windows clients will back up C:/, and Linux and macOS clients will back up /.
Using the File Set drop-down list, you can select a default file set based on the operating system, or you can customize your own file set (by selecting the file set having the name of the client).
VMware and Hyper-V backups are complete and therefore do not have an editable file set.
Whichever file set you select, you can then click Edit (![]() ) to edit the file set according to your needs. This opens the File Set Editor dialog.
) to edit the file set according to your needs. This opens the File Set Editor dialog.
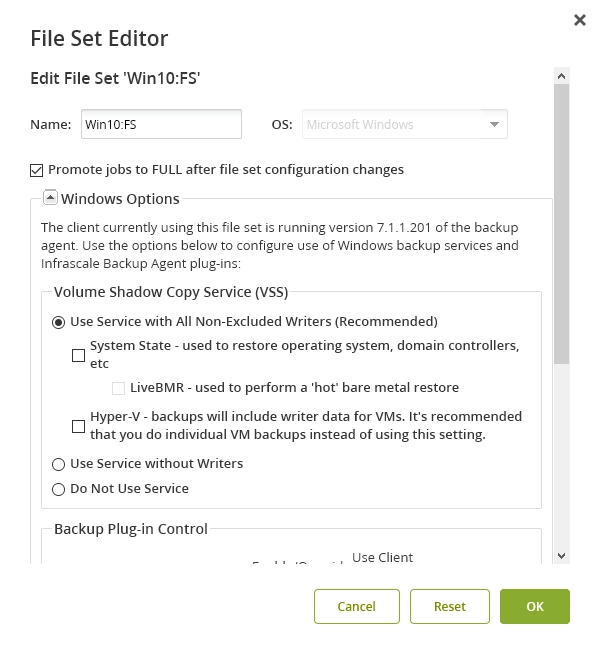
The File Set Editor window includes the following options.
| Option | Description |
|---|---|
| VSS | To let the agent back up open files, check the checkbox |
| Promote jobs to Full after file set configuration changes | Indicates if a full backup should be forced after the File Set configuration is changed |
| Override Client-Configured Plug-in Settings | Used to override the plug-in configuration. When the new control group is unselected, the override is not in effect, and all plug-in configurations are controlled through RVXConfig. |
Browse for starting point folders
To use the file browser to find folders and files for backup and add them to the client file set, go to Clients › Edit, click the file set Starting Directories and Files entry that you want to edit. (If no entries exist, click New to create an entry.)
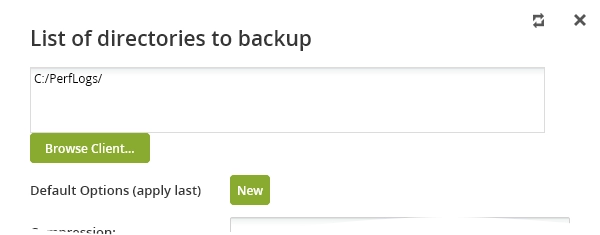
The list of directories to be backed up will appear, along with the Browse Client button, which enables you to browse the client file system.
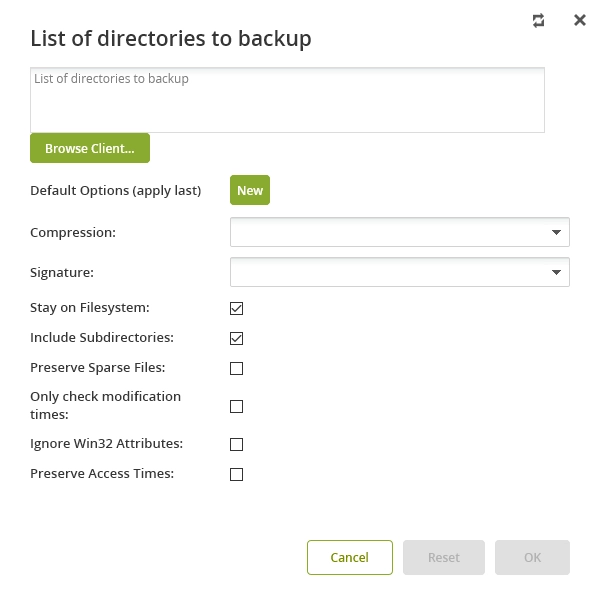
Click Browse Client and use the file browser to select a folder to add to the list.
In some cases, such as when you are editing file sets from multiple clients or editing shared file sets, you may be prompted to identify, from the available clients, the single client that you want to browse.
After you accept your selection in the file browser, the selection will be added to the list of directories to be backed up for the current file set.
VSS
VSS client plug-in now supports application writers as well as the previously supported in-use files. This complete implementation of the Microsoft standard is the foundation for many new features and functionality, and it will continue to provide for greater extensibility in future releases.
By default, most application writers that are discovered on a client will be backed up during a backup that has VSS enabled. The following exceptions apply:
The Microsoft SQL Server writer is never used. SQL plug-in provided by us has a richer feature set and is the preferred method for backing up and restoring SQL databases.
System writers will be backed up if the system state backup option is explicitly configured to be enabled on the client. If it is not enabled, all system writers will be ignored during backup.
The Microsoft Exchange Server writer is only used on Exchange 2010 clients when Exchange Database backups are explicitly configured using the plug-in override controls.
You can also exclude writers from backup by explicitly specifying them as excluded in the file set.
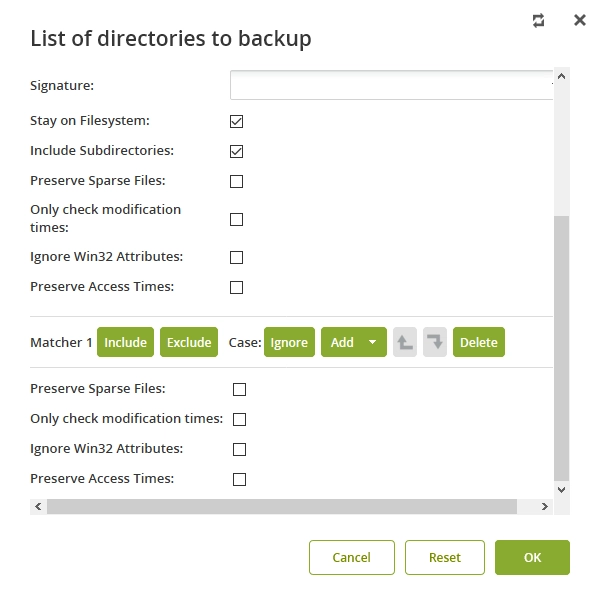
Matchers
Matchers are used for including or excluding files, folders, or writers from a given file set. Below are several examples of how to configure Matchers for different purposes.
Matchers may be created when editing a file set. Below the List of directories to backup, click New in the blue bar.
Add a matcher to an existing starting directories and files specification. Select the Exclude option and add a Plug-in Config.
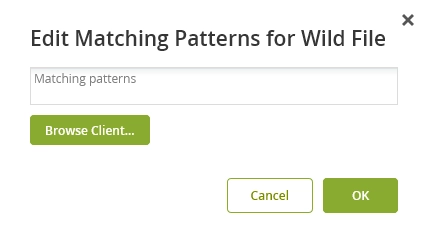
For each VSS writer that you want to exclude from being backed up, add it to the Matching Patterns dialog.
The format of the entries must be VSS:/name of writer where name of writer is the exact name of the VSS writer itself. (You can use the vssadmin tool provided by Microsoft to list all writers available on a particular system.)
If you click Browse Client, you can browse the writers available on the client and select a writer to add to the list.
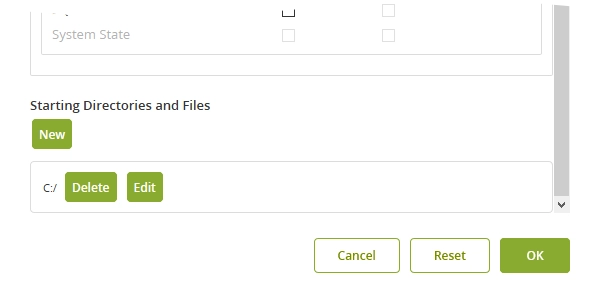
The Starting Directories and Files area shows what directories will be included in the backup. To add new directories, click New. To delete or edit an existing directory specification, click Delete or Edit, respectively.
If you click New, a window similar to the following will appear:
Enter the directories in the upper area of the window. You can select the various default options in the lower area by selecting the checkboxes or using the drop-down menus.
Be aware that the order of the matchers is important. For example, the job will fail if you first exclude everything and then try to include a certain folder.
Matchers may be used for any file system; the examples below are written as if for Windows but could easily be converted to macOS, Linux, or NetWare.
Matching examples
- Example 1
This will back up the entire
C:/but will exclude any file with the.mp3extension.List of directories to backup:
C:/Matcher: Exclude, Case Ignore, Wild
File:
*.mp3- Example 2
This will back up everything under
/departmentsand exclude only the/my musicfolders.List of directories to backup:
D:/departmentsMatcher: Exclude, Case Ignore, Wild
Directory:
D:/*/my music- Example 3
This will back up everything at the
/departmentslevel and for each user, the/my documentsfolder and all its contents. Everything else will be excluded.List of directories to backup:
D:/departmentsMatcher 1: Include, Case Ignore, Wild
Directory:
D:/departments/users/*/my documentsMatcher 2: Exclude, Case Ignore, Wild
Directory:
D:/departments/users/*/*- Example 4
A more complex combination similar to all of the above. macOS users may recognize these paths, the
C:was added just for the example.This will backup each user’s
DesktopandDocumentsfolder. The subfolderMicrosoft User Datawill be excluded. Any files with.mp3,.exe, or.aviextensions will be excluded. All other directories under the starting point are excluded.This one requires a bit more explaining. Obviously, we have our starting directory and we are excluding three different file types. What is not clear is the fact that the path in Matcher 2 is a subdirectory to a path in Matcher 3. In other words, we are preemptively excluding
/Microsoft User Data, which is a subdirectory of the included/Documentsdirectory. We then exclude everything else.List of directories to backup:
C:/volumes/docs/staff_dataMatcher 1: Exclude, Case Ignore, Wild
File:
*.mp3;*.exe;*.aviMatcher 2: Exclude, Case Ignore, Wild
Directory:
C:/*/Microsoft User DataMatcher 3: Include, Case Ignore, Wild
Any:
C:/volumes/docs/staff_data/*/Desktop</code>;C:/volumes/docs/staff_data/*/DocumentsMatcher 4: Exclude, Case Ignore, Wild
Directory:
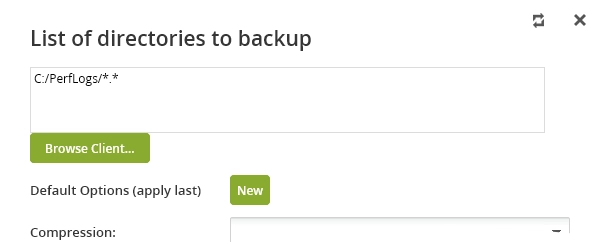
C:/volumes/docs/staff_data/*/*If using regular expressions the
*should change to.*.
Matchers can be highly useful to trim down your backups and save space on your appliance. They also may be a little tricky to get right on the first try. If these examples do not help your scenario or you have other questions, feel free to contact Infrascale Support for help. If you can describe exactly what you want, we should be able to help you create the matcher set to make it happen.
For information on regular expressions, see POSIX regular expressions.
Browse for files and folders used to define matchers
To use the file browser to find folders and files and specify them as wildcard or regular expression (matchers) for the client file set, go to a file set Starting Directories and Files entry that you want to edit. (If no entries exist, click New to create an entry.)
Find an existing matcher that you want to edit, or click New to create a new matcher. Click Add and select the type of matcher condition that you want to add.
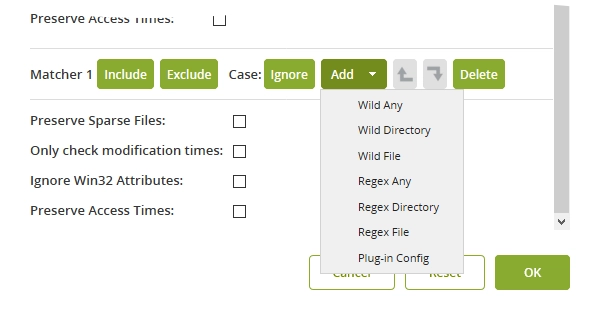
The current list of patterns for the selected condition will appear along with the Browse Client that enables you to browse the client file system.
Click Browse Client and use the file browser to select a folder or file to add to the list.
In some cases, such as when you are editing file sets from multiple clients, you may be prompted to identify the single client that you want to browse.
As you browse a client, keep in mind that you must select the folder by clicking it in the Entry List pane. The selection will then appear in the File Selection area at the bottom of the screen.
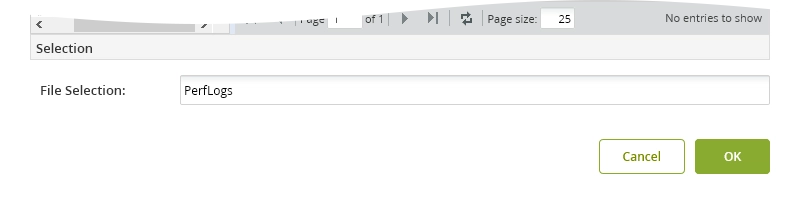
After you accept your selection in the file browser, the selection will be added to the list of patterns for the selected condition.
You can further modify the new pattern by editing the text in the text area as needed.
Disaster recovery image settings
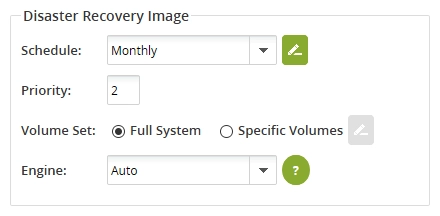
The Disaster Recovery Image group has the following settings:
Schedule. Allows to set a separate schedule to run your DR image backups, independent of your file backups.
Priority. Allows you to set the priority of the client for DR image backups.
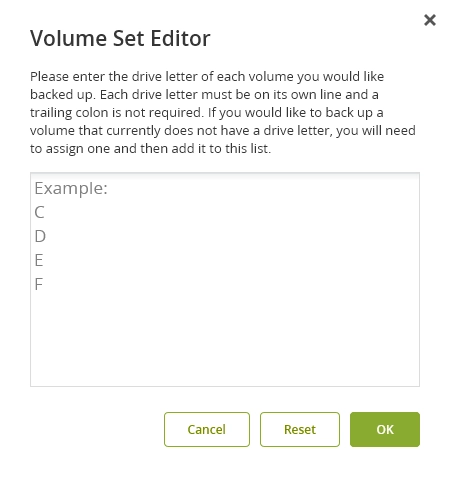
Volume Set. Allows to choose which volumes in Windows are captured with DR image backups. These are set by specifying the drive letter that Windows has assigned to the volume.
Appliance networking settings
From the Interface drop-down menu, select the network interface for your appliance. This tells the client, which IP on the appliance to send its data to when doing a backup. This only rarely needs to be set.
If you select NAT, you are required to specify an IP address. If your appliance is behind a router doing NAT, and you have forwarded port 9103 to the appliance to let clients on the other side of that router access the appliance, you will have to put the router IP here because clients on the other side of the router will not be able to talk to the appliance IP address directly. This is a rarely used option.
Job retention settings
On primary
These settings allow you to create a job retention period for each backup level. Jobs that exceed this retention period will be automatically deleted from the RAID, freeing the disk space they once used.
If you do not select the checkbox for a backup level, those backups will not be deleted but will be kept forever (or until manually deleted).
For each backup level, specify the number and use the drop-down list to select the unit (years, quarters, months, weeks, and so on).
The month option reflects 30 days, not the number of days in the current calendar month. If you wish to reflect a 31 day month, it is recommended to set the recycling schedule to 31 days rather than 1 month.
If you would like to change the default retention settings for newly created clients, you may do so in Jobs › Retention.
In the cloud
These settings allow you to create a Job Retention policy for jobs that have been replicated offsite. These settings will only be applicable if replication is enabled.
If you would like to change the default retention settings for newly created clients, you may do so in Jobs › Retention.
Offsite settings
The Replicate checkbox selects to have the jobs for this client replicated to the cloud or secondary appliance (if replication is configured). There is also a priority number which indicates the relative importance of replicating jobs for this client compared to other clients. Those with a lower number will be queued for replication ahead of those with a higher number.
Purge Remove Jobs checkbox selects if the jobs for this client that have been replicated to the replication target should be left in place on that target machine, or deleted when replication is disabled for this client.
Error recovery settings
The Error Recovery group has two settings:
| Setting | Description |
|---|---|
| Rerun Failed | Re-run failed backup jobs |
| Recover Entries | How many times to retry the backup job and at what interval |
VMware settings
| Setting | Description |
|---|---|
| Allow Change Block Tracking | If enabled, Change Block Tracking (CBT) will allow for incremental and differential backups of VMs |
| Ignore Unallocated Sectors | When CBT is enabled, this will only perform backup of the used portion of the disk 2 |
| Quiesce Data | If selected and the VM is powered on when the snapshot is taken, VMware Tools is used to quiesce the file system in the VM. Quiescing a file system is a process of bringing the on-disk data of a physical or virtual computer into a state suitable for backups. This process might include such operations as flushing dirty buffers from the operating systems in-memory cache to disk, or other higher-level application-specific tasks. 3 |
| Skip Independent Persistent Disks | This option allows the appliance to skip any VMDKs in a VM that are in independent persistent mode, and continue to back up the other disks. VMware provides the independent persistent mode for virtual disks to allow them to be excluded from snapshots. This is sometimes used to allow snapshots to be taken of the operating system and primary data disks for a VM without having to include disks used for temporary data (cache, temp files, and so on). If your VM has a virtual disk in independent persistent mode when the snapshot is taken for backup, the job will fail unless this option has been selected. |
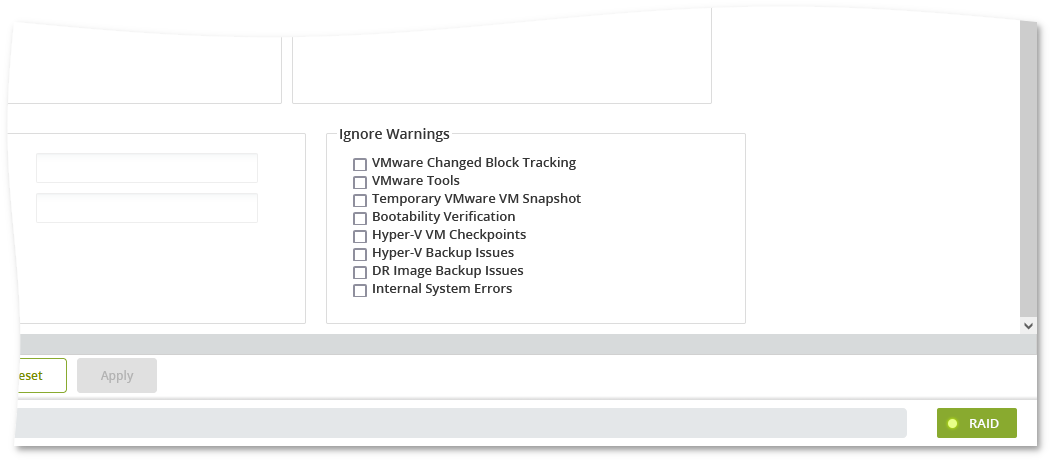
Ignore warnings
By default, the appliance monitors various events related to the jobs of the backup clients, records activity in the system logs, and reports any warnings on the Dashboard tab.
This feature applies only to successful backup jobs. Backup jobs that fail are not affected.
You can select the type of warnings to ignore and not to show on the Dashboard tab. (The appliance will still record them in its system logs.) For this, select the types of warnings from the list, and then click Apply.
| Warning | Description |
|---|---|
| VMware Changed Block Tracking | VMware CBT is unavailable for the VM, or inactive for some of its drives, or may need to be reset |
| VMware Tools | VMware Tools is not running or is outdated. A crash-consistent snapshot of the VM may be taken. |
| Temporary VMware VM Snapshot | The system cannot remove a temporary VM snapshot left after the backup |
| Bootability Verification | The image misses a bootable partition, or has multiple boot partitions, or lacks the available disks, or the system cannot identify the operating system |
| Hyper-V VM Checkpoints | Hyper-V VM has checkpoints. Booting, restoring, and browsing and restoring features are not supported for checkpoints. |
| Hyper-V Backup Issues | Warnings encountered during Hyper-V VM backup that do not affect the backup result. |
| DR Image Backup Issues | Warnings encountered during DR Image backup that do not affect the backup result. |
| Internal System Errors | Non-qualified internal system warnings that do not affect the backup result and do not fall into other categories |
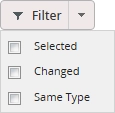
Filter list of clients to edit
You can use the Filter drop-down list on the Edit Clients line to display only clients on the Clients Edit tab that are selected, or have been changed (since the last you activated the configuration).
View or modify default client settings
To view the default client configuration (which will apply whenever you create a new client), click Defaults on the toolbar.
If you want to modify the default client configuration, after you make your changes, click Apply.
When you have finished viewing or modifying your client defaults, click Defaults again.
Use this schedule sparingly, because it could quickly use up your available backup space. ↩
For information on how to enable CBT manually, see the VMware Docs. ↩
If the VM requires the CBT reset (usually due to a host being shut down uncleanly), see how to reset CBT for a VM. ↩