
Overview
The RAID Configuration section provides the interface to manage Backup & Disaster Recovery appliance RAID, if any.
This section is available in the Management Console of the physical appliance only.
RAID system does not require any user intervention under the regular operating conditions. In the event of a hard drive failure, use this interface to prepare the drive for replacement, and to repair the RAID array.
Getting started
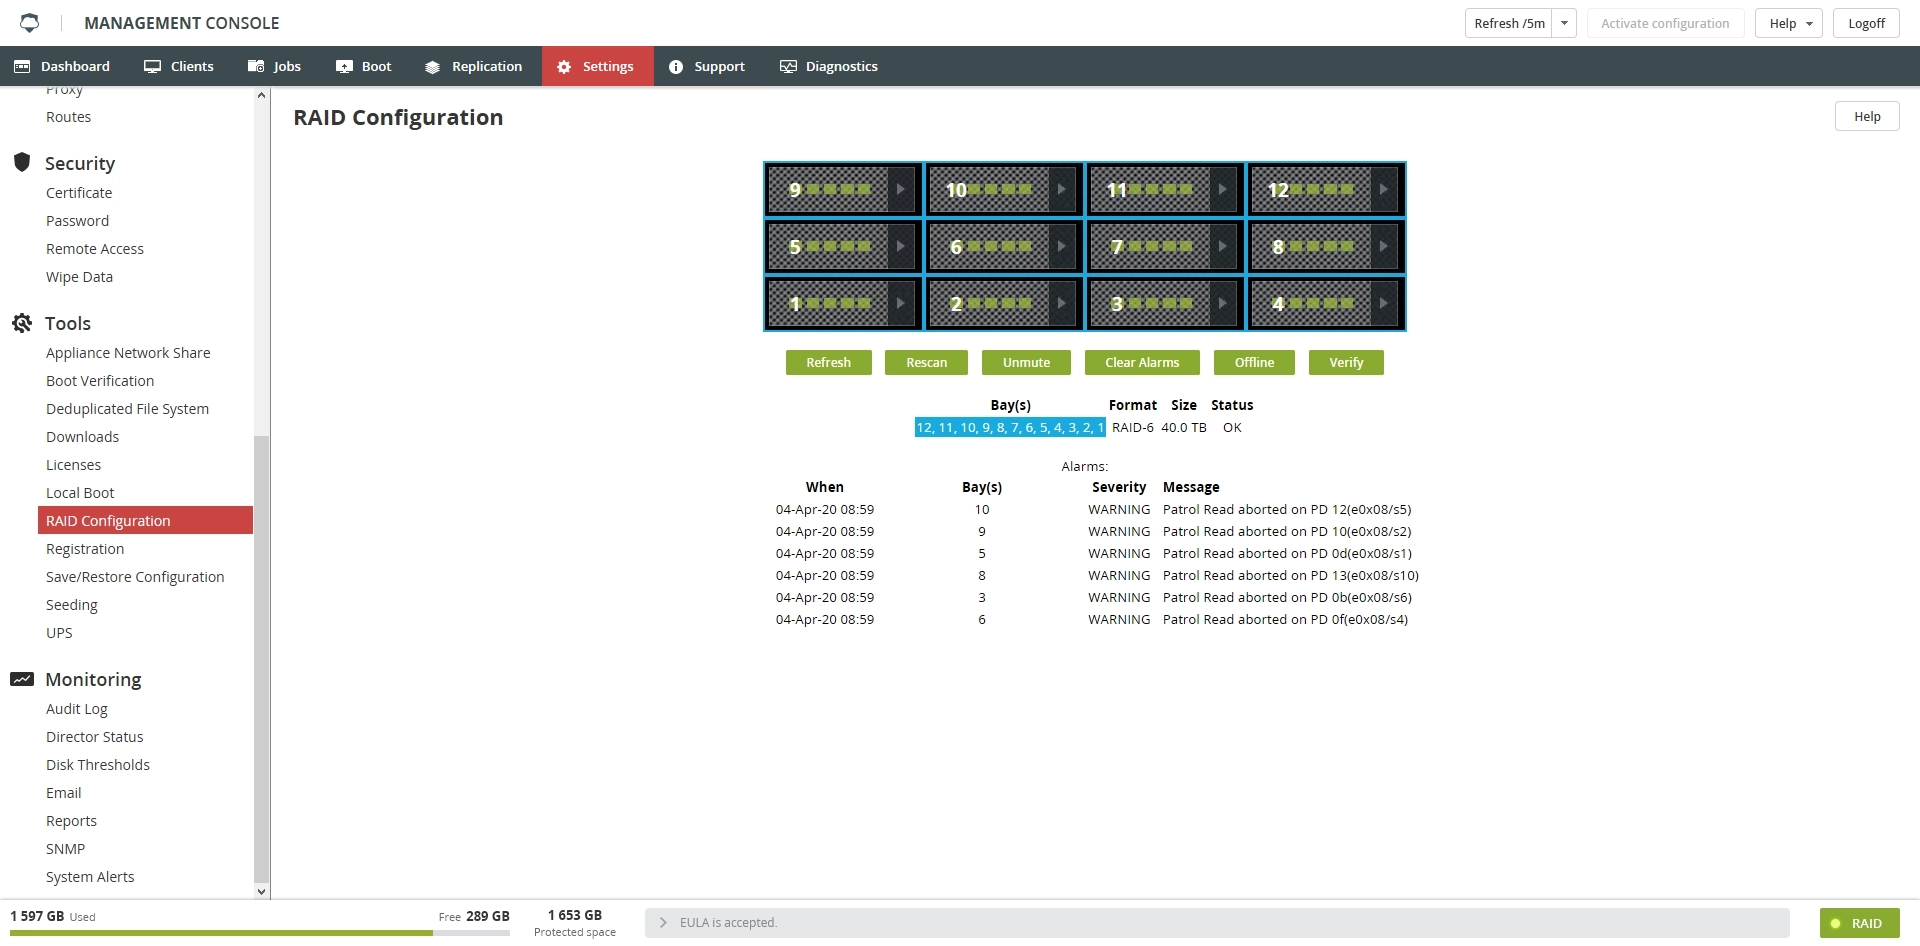
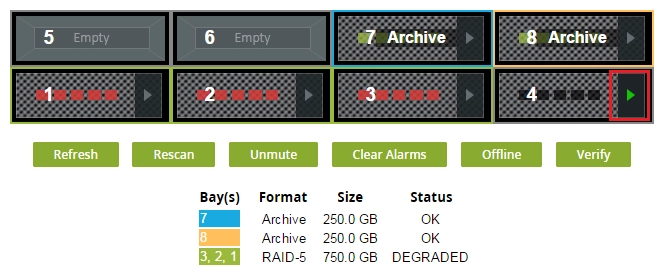
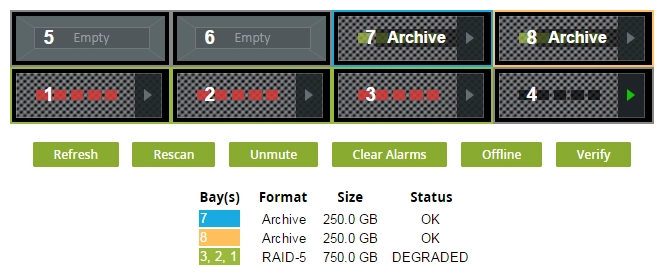
The bay configuration section shows the logical setup and status of the bays in the table format. The table lists the bays, their format, storage capacity, and the status.
The Alarms section shows the list of recent messages regarding the status of the individual RAID arrays. For a complete list of events and their explanations, see Array notification events.
If an array and its constituent disks are operational, the background color of the drive bays is green.
If any of the RAID arrays have problems, the background color of the drives is red, and a red banner is displayed on the View Notices screen. In addition, the RAID icon in the lower right will be red. Any notice will cause the banner behind View Notices to turn red.
Identifying a failed disk
When the system detects a failed disk in one of the redundant arrays, the failed disk will be marked with ![]() . Once a disk and its associated array have been marked, the first step is to try to rebuild the array. If the rebuild fails, it is likely the failed disk needs to be replaced to restore array integrity. Contact Infrascale Support to confirm, if necessary. Once the new disk has been installed, the associated array must be rebuilt.
. Once a disk and its associated array have been marked, the first step is to try to rebuild the array. If the rebuild fails, it is likely the failed disk needs to be replaced to restore array integrity. Contact Infrascale Support to confirm, if necessary. Once the new disk has been installed, the associated array must be rebuilt.
If the disk was removed or taken offline accidentally, you only need to rebuild the degraded array.
Restoring array operation
Once you have identified a failed disk drive, complete the steps in the following sections to replace the drive and restore the array to full operation.
Step 1. Removing failed disk logically
While RAID disks are hot-swappable, to logically remove the disk, click the button associated with the bay of the failed disk, and then click Offline. (Archive drives must always be prepared for removal.)
When prompted to confirm the Offline action:
Click Yes to remove the selected disk (taking it offline), or
Click No to cancel the operation.
Once the disk is logically removed, you can no longer select the bay without first using Rescan.
Step 2. Replacing failed disk
Physically remove the failed disk and replace it with a good one of equal (or greater) capacity. A tested and supported replacement disk can be obtained from your Infrascale dealer or reseller.
To remove the disk, slide the button on the drive bay to the right to release a small lever. Pull back the lever until the disk and the mounting sled are released from appliance.
Insert the new disk and sled into the drive bay until the disk is almost entirely inserted. You should feel a small amount of resistance. Then press the lever to finish inserting and locking the sled into place.
Do not remove two or more array disks at once. It may result in the data loss, and you will need to restore the data from an archive.
Step 3. Rebuilding array
Once you have installed and scanned the new disk, you can start rebuilding the failed array. Select the button of the replacement disk, along with the button(s) of any other disk(s) in the failed array, and then click Rebuild.
The system will begin to rebuild the array, and the background of the array disks will become yellow. The rebuilding status is displayed with ![]() , and the status changes to Rebuilding tracking % of completion. When
, and the status changes to Rebuilding tracking % of completion. When ![]() is covered with green slices, the rebuilding process is complete, and the background colors are reset to green.
is covered with green slices, the rebuilding process is complete, and the background colors are reset to green.
The rebuild process can take up to two hours per 1 TB. During this time, the system is fully operational, but may exhibit reduced performance. The busier appliance is with other processes while the RAID is rebuilding, the slower the array will rebuild. To maximize rebuild speed, contact Infrascale Support to stop services. While these services are stopped, backup jobs will not run. This is recommended for large arrays.
Step 4. Rescanning array
Click Rescan to scan the RAID for new disks. The system will recognize any new disk, including the one just replaced. If the new disk appears to have data stored on it, you will need to format the disk before it can be used for rebuilding the array.
Step 5. Formatting new disk
This step may be necessary only if the new disk appeared to have been used before to store non-redundant data. If reformatting is necessary, the system will enable the Reformat button and prevent you from rebuilding the array with this disk until the disk has been reformatted. Reformatting will cause some basic information on the disk to be erased and any previously stored data to be lost. Reformatting should only take a few seconds. Once the disk is reformatted, it can be used for rebuilding a failed array.
Command button actions
The actions of the command buttons in the displays are summarized in the following table:
| Button | Description |
|---|---|
| Refresh | Refresh the disk data |
| Rescan | Scan disks for physical changes and update the display presentation |
| Clear Alarms | Clear all alarms |
| Rebuild | Rebuild the array using the selected disk |
| Offline | Take the disks in the selected bays offline, prepare them for physical removal |
| Reformat | Make a disk in the RAID bay or in the archive bay usable for that bay’s function by erasing data on the disk. This is a high-risk operation. Be careful not to reformat a disk that you used to save data unless you no longer need the data. |
| Verify | Start the array verification |
| Stop Verify | Stop the array verification |
Array notification events
The following table explains the most common messages than can appear in the Alarms box on the RAID status page. These messages will be preceded by the time the event occurred, the bays of the disks involved, and the severity of the message.
Here, port refers to a physical disk, and unit refers to an array.
| Message | Description |
|---|---|
| Drive error | An error occurred with the disk in the specified bay |
| Incomplete unit detected | Incomplete unit detected disks to bring it online |
| Rebuild failed | Failure to rebuild an array |
| Array degraded | The system stopped using a disk in the specified array, and started using the redundant information to retrieve data |
| Verify failed | Failure to verify the redundant information in an array. The disk that contained erroneous data is given. |
| Initialization finished | The system finished creating the redundant information on a new array or on an array that was not cleanly shut down |
| Initialization started | The system started creating the redundant information on a new array or on an array that was not cleanly shut down |
| Rebuild finished | The system finished rebuilding a replaced disk with information from the other disks in the specified array |
| Rebuild started | The system started rebuilding a replaced disk with information from the other disks in the specified array |
| Verify complete | Verification process finished on the specified array |
| Verify started | Verification process started on the specified array |
| Soft reset occurred | The disk was reset without powering down |
| Array degraded | The specified array failed and requires replacement |
| Controller error | The disk controller of the specified disk reported an error |
| Logical array deleted | The specified logical array was deleted |
| Sector repair occurred | Sector repair occurred. A sector on the specified disk reported an error and was repaired. |
| Encountered bad sector during rebuild | During a disk rebuild, a bad sector was found |
| Replacement drive is too small | A replacement disk is smaller than the failed one |
| Verify error | An error occurred during verification of the specified disk |
| Drive not supported | The specified disk is not supported by appliance |
| Unclean shutdown detected | If appliance is not properly shut down, the system does not have time to stop the RAID controllers. This may cause the system to re-initialize the RAID array. Initialization can cause performance degradation. Loss of data may also occur. Turning off the power, pressing the Reset button, or losing power to the box are the common ways to cause an unclean shutdown. |
Status values
The following table describes the messages displayed in the bay configuration and status section.
| Message | Description |
|---|---|
| Degraded | When the |
| Initializing | The system is calculating the redundant data used to recover information in the event of a disk failure or loss |
| Rebuilding | The system is recalculating the information of one or more disks in an array, usually because of a disk replacement process |
| Unused | There is no disk in the drive bay |
| Verifying | The system is recalculating the redundant data and comparing it to the data on disk to ensure the integrity of the entire array |