
This functionality is deprecated and not available since Infrascale Backup & Disaster Recovery 8.12.0.
Introduction
Use the Libraries subtab to manage the archive media on your system.

Selecting archive library
The screen will list the archive libraries available on your system. The first button lists the built-in archive hard disks. The second button is for an external USB drive.
Click the button for the library that you want to view.
Viewing archive library
After you select a library to view, a screen similar to the following will appear:

For each disk in the library, a graphic similar to the following is displayed:

This graphic contains:
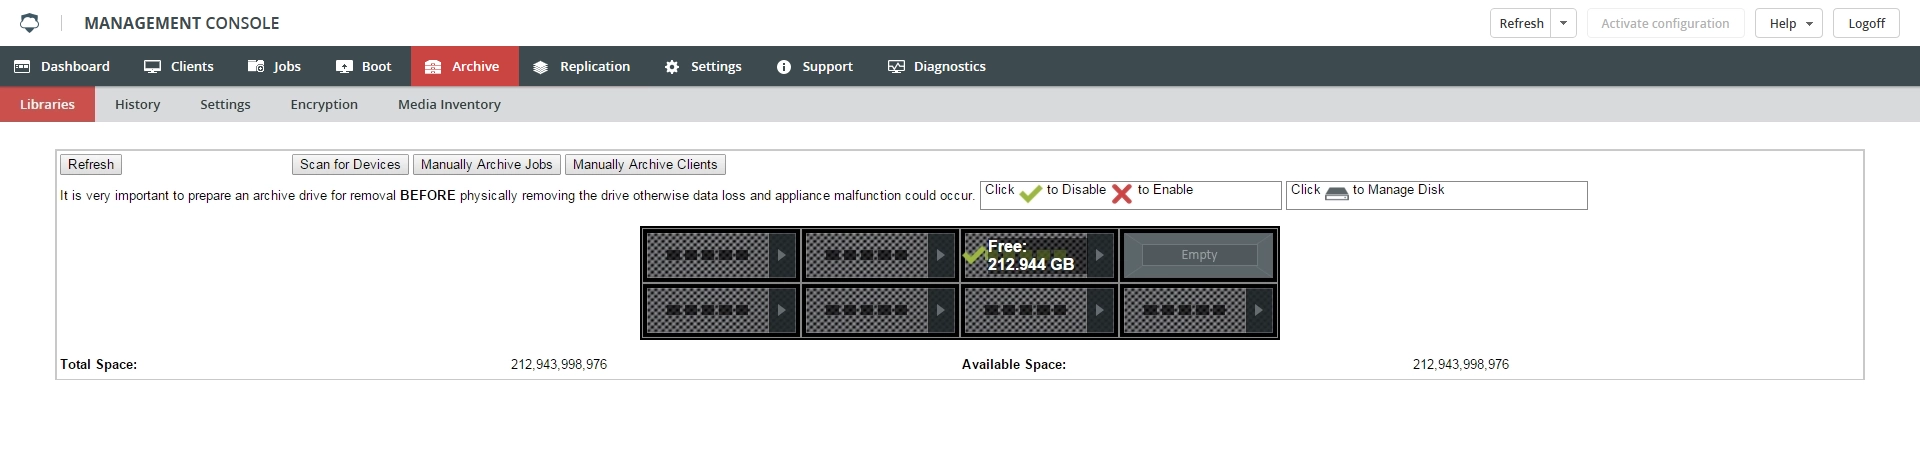
A green check mark indicating that use of the archive library is allowed. If you click the check mark, it becomes a red X, which disables use of the archive disk. Click the red X to toggle back to the green check mark and enable the drive.
The amount of total disk space and available (free) disk space. The Total Space and Available Space numbers listed along the bottom of the screen reflect the total of all installed disk drives.
The disk model information.
The Manage Disk icon (the disk drive icon, on the right), which you select to view the Manage Archive Disk screen documented in the next section.
The screen shown in Viewing the Archive Library is the screen that you will use to archive backup jobs, using the Archive Jobs or Archive Clients button. That process will be documented later, in Testing the Archive Disk.
To verify that disks are suitable for archive, all new disks must be tested. This applies to:
Disks that have not been used for archiving
Disks that may have been used for archive but have undergone other formatting or alterations from an outside source
A Foreign Disk label will appear over the graphical representation of the disk.

Clicking this icon will bring you to a message similar to the following:
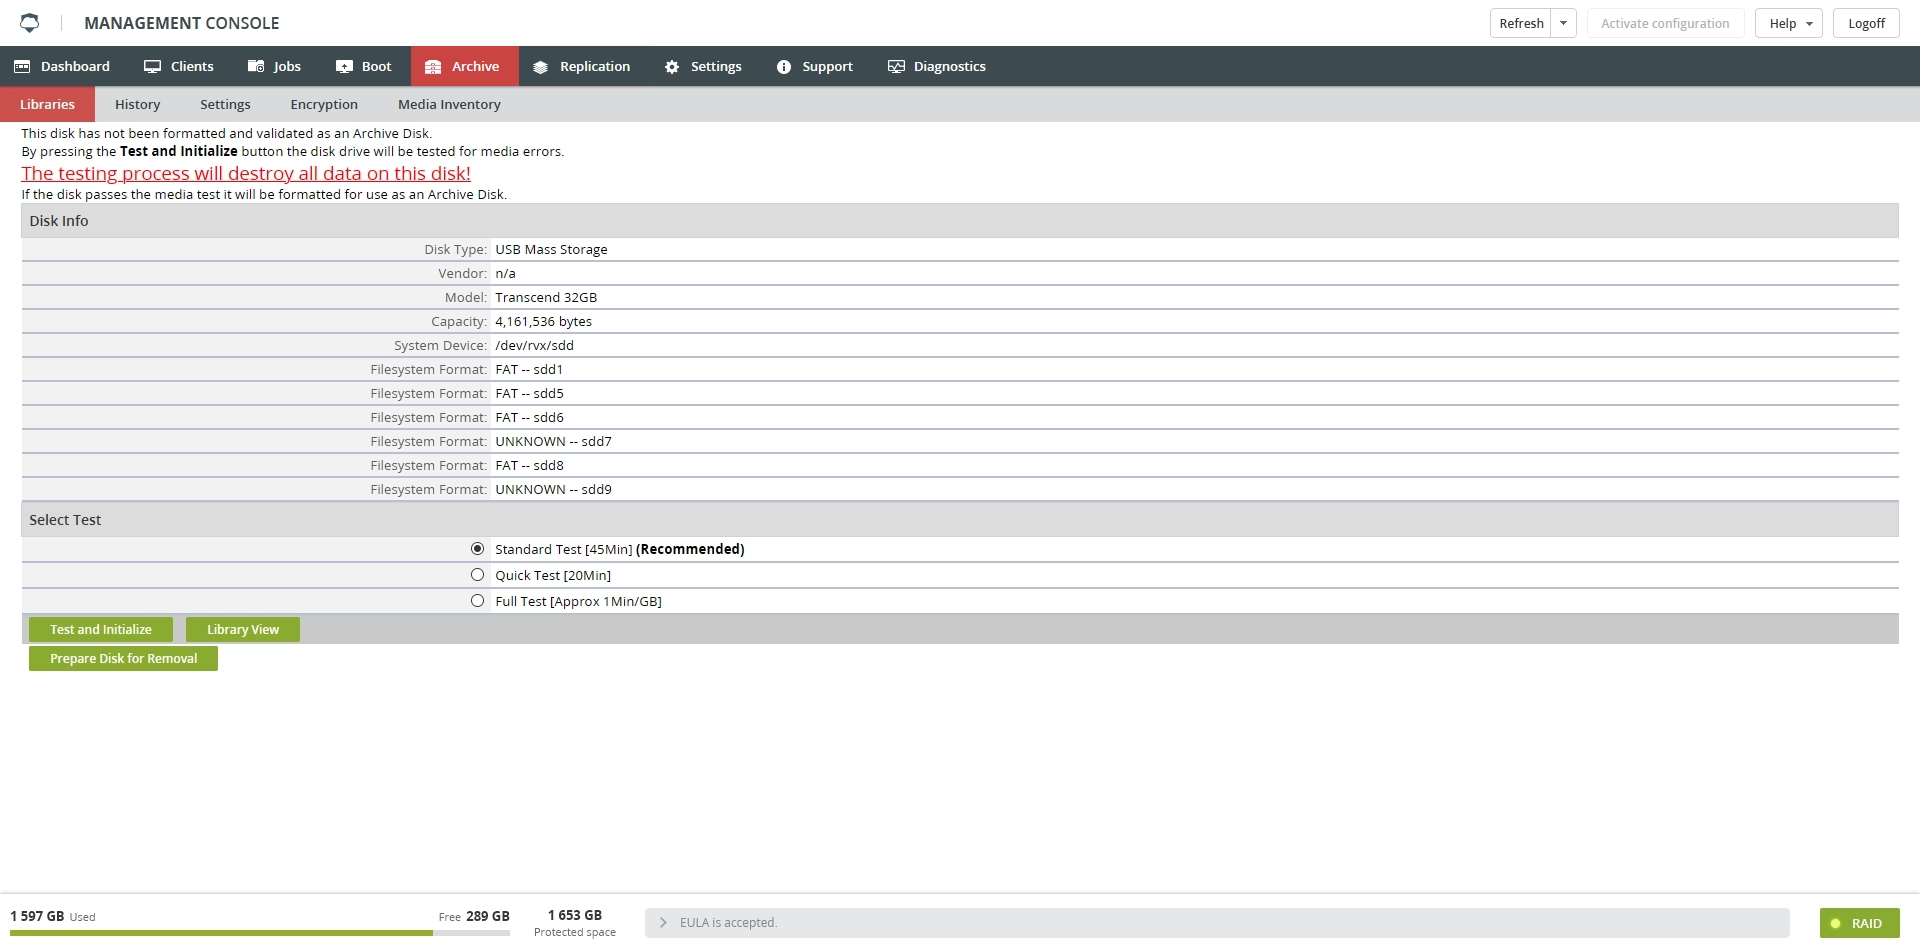
To test the disk (which will clear this message), choose from the Select Test section. There are three testing options:
| Option | Description |
|---|---|
| Standard Test | Reads and writes on many of the disk sectors; will usually detect errors. This test takes about 45 minutes to complete, and is the recommended test. |
| Quick Test | Less thorough, but will satisfy the testing requirement; may not find errors, but the disk will be ready for archiving. This test takes about 20 minutes to complete. |
| Full Test | Tests every sector of the disk; will find any errors that exist. This test takes about a minute for every gigabyte of disk capacity. |
Select the testing option, and then click Test and Initialize.
Manage Archive Disk screen
When you click the disk drive a Manage Archive Disk screen similar to the following will appear:
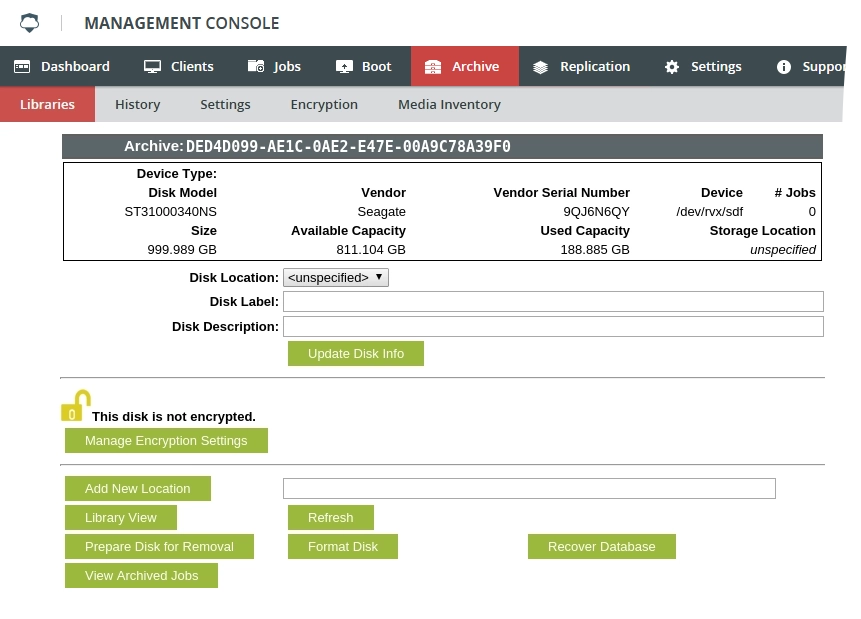
The top section of the screen lists information about the archive disk.
In the next section of the screen you can specify the disk location and enter optional disk label and disk information.
The Disk Location setting is an arbitrary location description that you can add for each disk, which is used to track where different archive disks are located.
This setting uses a drop-down menu to select locations. To add a location to this menu, type the location name in the text box to the right of the Add New Location button at the bottom of the screen, and then click Add New Location.
To apply the information that you enter in this section, click Update Disk Info.
The bottom part of the screen has the following buttons:
| Button | Description |
|---|---|
| Manage Encryption Settings | To manage your encryption settings, click Manage Encryption Settings. The screen that appears is the same screen as on the Encryption subtab (see the Encryption subtab). |
| Add New Location | Add a new location for the Disk Location setting above. Enter the text into the box, and then click this button. |
| Library View | Return to the archive library view described in the previous section, Viewing the Archive Library |
| Prepare Disk for Removal | Prepares the archive disk for removal from appliance (or for drives connected via USB). Once the Scan for Devices button appears, it is safe to remove the disk media. Always use this button when removing any disk media; data corruption or data loss may occur if drives are not removed properly. |
| View Archived Jobs | Lists all of the backup jobs that have been archived to that archive disk. See the Viewing Archived Jobs section. |
| Refresh | Refreshes the screen content |
| Format Disk | Formats the disk and initializes it for archive use. You will be prompted for confirmation; click Yes to continue, or click No to cancel. When you format a disk, all existing data on the disk is lost. |
| Recover Database | Recovers the database for the archive disk. As the screen warns, the process may take some time, and the disk will not be available for archive operations until the recovery is complete. Click Yes to continue, or click No to cancel. |
Viewing archived jobs
When you click View Archived Jobs on the Manage Archive Disk screen, the screen expands to present a list of the backup jobs that have been archived to that archive disk.
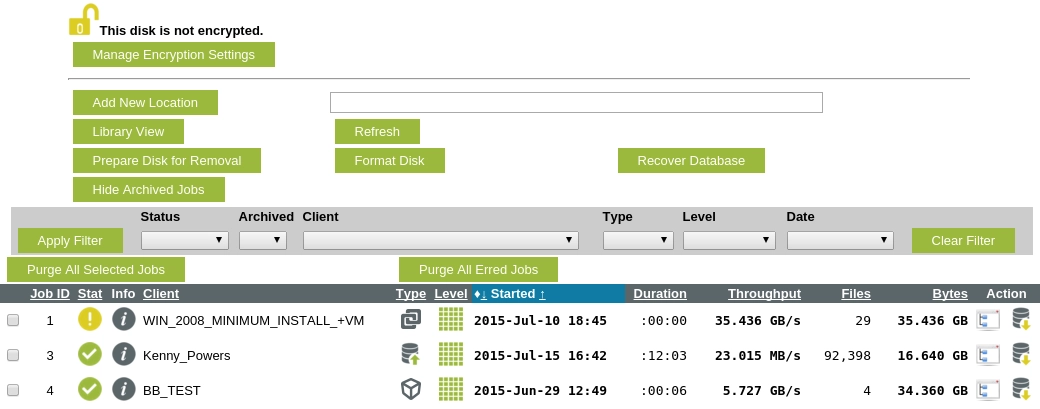
This list of jobs is similar to the Jobs History screen (see the History subtab). You can sort by a particular column (for most columns) by clicking the column heading (which will then be highlighted). In the case of the Started column, click either the up-arrow or the down-arrow to sort in ascending or descending order, respectively.
To view information about a specific job, click ![]() in the Info column.
in the Info column.
You can customize the job list by applying the following filters (at the top of the archived files section):
| Filter | Description |
|---|---|
| Status | The job status—successful or erred |
| Archived | Indicates if the job was or was not archived |
| Client | The client for the job |
| Type | Backup or restore |
| Level | Full, differential, or incremental |
| Date | How recently the job was performed: last 24 hours, last seven days, last 30 days, and so on |
Each filter field is a drop-down list of options; the default selection is blank (not filtered by that field). After you have set one or more filters, apply them by clicking Apply Filter</strong>; then only the items that meet your filter criteria will be listed. To clear the filters, click Clear Filter.
The Action column on the far right has two icons for each job entry:
| Icon | Action | Purpose |
|---|---|---|
| Browse | View the individual files for the job | |
| Restore | Restore the files for the job |
The file browser is a type of interactive restore process: you can choose exactly what you want to restore. Through the file browser you may select all files by checking the top directories and folders in the file structure or by clicking on those directories you can explore the file structure and select only those files you wish to restore.
When browsing a Windows client, the interactive browse session shows the Windows client’s drive designators as subdirectories of a directory
/. For example, theC:drive would appear as/C:/.
When browsing an Incremental job, only directories modified since the last backup will be displayed with attributes. If a directory is displayed without attributes, then it leads to another directory that has been modified.
Restore. To select a file or directory for restoration, simply select Add next to the file or directory name and click Apply. If a directory is added, all its files and subdirectories are automatically chosen as well. If a directory has only some of its files or subdirectories marked for restore, a + sign will appear next to the Add checkbox for that directory. If a subdirectory has had all of its contents marked for restoration, the checkbox will be checked and the directory name will appear in bold.
If the Relocate Restored Files To box is left blank, selected files will be restored to their original location. If you wish to restore the files to another location, enter the desired directory path in the text box.
To restore files to another client, change the client in the Restore to Client option menu. If the client you are browsing is a Microsoft Windows client, the client you select to restore to must also be a Microsoft Windows client. There are no restrictions for restoring files from a UNIX-based client to a client of any other Unix flavor.
The Apply button must be used to register the relocation directory. If you enter a value in the text box and click a directory link to continue browsing, the relocation directory will be lost.
Each component of the Directory Path at the top of the page is a selectable link that accesses the directory selected. You may use this feature instead of repeatedly pressing ![]() .
.
After all desired files and directories have been selected for restoration, click Restore.
When files are restored to a different location or a different client, they are restored with their entire path. For example:
Original file path: C:/Program Files/file123
Restore to location: C:/Temp
The file will be found in: C:/Temp/C:/Program Files/file123
If you restore directly from the archive, the record of the restore will be on the archive drive, not on appliance. If you import the job back onto the RAID before restoring, the restore record will also be on the RAID.
Restore jobs are done asynchronously with respect to the UI. A summary of the request will be presented and the actual restore may have to wait for existing backup jobs to finish. You can select the checkboxes in the list to select one or more jobs. You can then use the following buttons:
| Button | Description |
|---|---|
| Purge All Selected Jobs | Clean up selected jobs from the disk. Jobs are never automatically removed from the archive disk; they are removed by purging them (or by formatting the disk). |
| Purge All Erred Jobs | Clean up any erred jobs that may have been copied to the archive disk. This can help free up disk space. |
| Import Selected Archive Jobs | Move archived jobs back onto appliance. Archived jobs must be re-imported before they can be restored. After you confirm the import, you will see the Archive in Progress page, except that the text Importing Archive Jobs will be displayed at the top. When the progress bars are full, the job is complete and available to restore. |
Using new archive disks
After you remove an archive disk, the Archive Libraries screen similar to the following will appear, showing an empty disk bay:
To prepare for use any new disks that you have inserted, complete the instructions in the following sections.
Scanning for devices
To scan the system for any new archive disks, click Scan for Devices. The screen will display information for any new disks that are found. This always needs to be done with a new drive before archiving will resume.
The system will scan all available disk bays regardless of which drive bay is associated with the Scan for Disk button.
If the disk you have selected for archiving has not been used before, it will show as a Foreign Disk which will need to be associated with appliance.
Formatting disk
To format the new disk and initialize it for archiving, click ![]() to get to the Manage Disk area. Next, click Format Disk. A confirmation prompt similar to the following will appear:
to get to the Manage Disk area. Next, click Format Disk. A confirmation prompt similar to the following will appear:
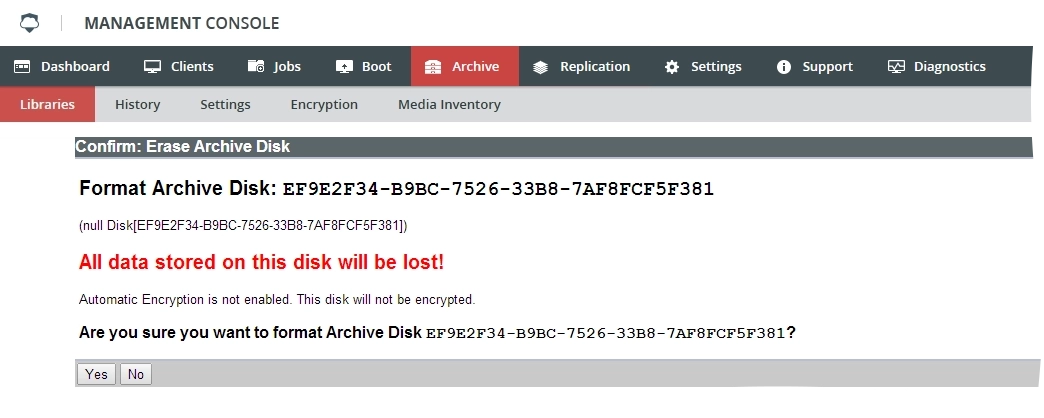
To format the disk, click Yes.
Testing archive disk
To verify that disks are suitable for archive, all new disks must be tested. This applies to:
Disks that have not been used for archiving
Disks that may have been used for archive but have undergone other formatting or alterations from an outside source
A Non Archive Disk label (![]() ) will appear over the graphical representation of the disk. Clicking this icon will bring you to a message similar to the following:
) will appear over the graphical representation of the disk. Clicking this icon will bring you to a message similar to the following:
To test the disk (which will clear this message), choose from the Select Test section. There are three testing options:
| Option | Description |
|---|---|
| Standard Test | Reads and writes on many of the disk sectors; will usually detect errors. This test takes about 45 minutes to complete, and is the recommended test. |
| Quick Test | Less thorough, but will satisfy the testing requirement; may not find errors, but the disk will be ready for archiving. This test takes about 20 minutes to complete. |
| Full Test | Tests every sector of the disk; will find any errors that exist. This test takes about a minute for every gigabyte of disk capacity. |
Select the testing option, and then click Test and Initialize.
A Confirm Test and Initialize window similar to the following will appear:
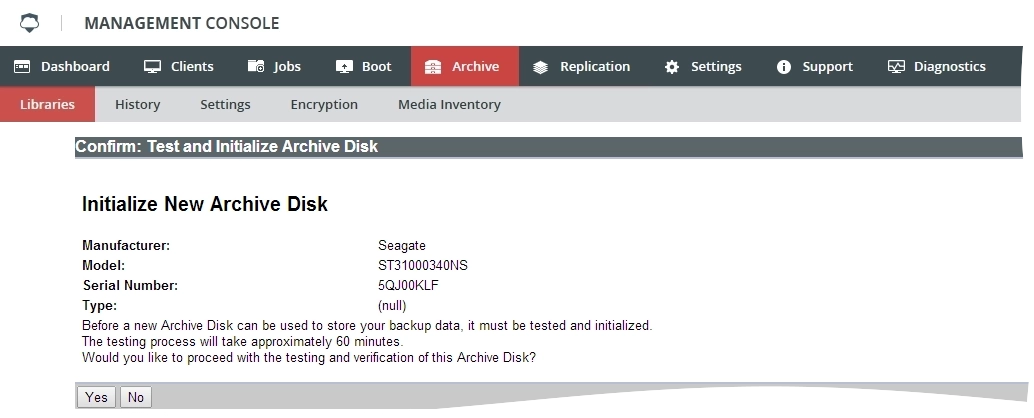
Click Yes to continue or No to go back.
Once the disk has been formatted and tested, it is ready for use as an archive disk.
Archiving jobs
Use the Archive Jobs button to manually copy backup jobs onto an archive disk for off-site storage. See Archiving under Edit subtab for more information on automatic archiving.
This screen has buttons for two archiving options:
| Button | Description |
|---|---|
| Archive Jobs | Use to select individual backup jobs for archiving |
| Archive Clients | Use to archive all of the backup jobs for each of the selected clients |
The instructions for archiving jobs and archiving clients are very similar. The instructions below walk through archiving jobs.
When you click Manually Archive Jobs, a screen similar to the following will appear:
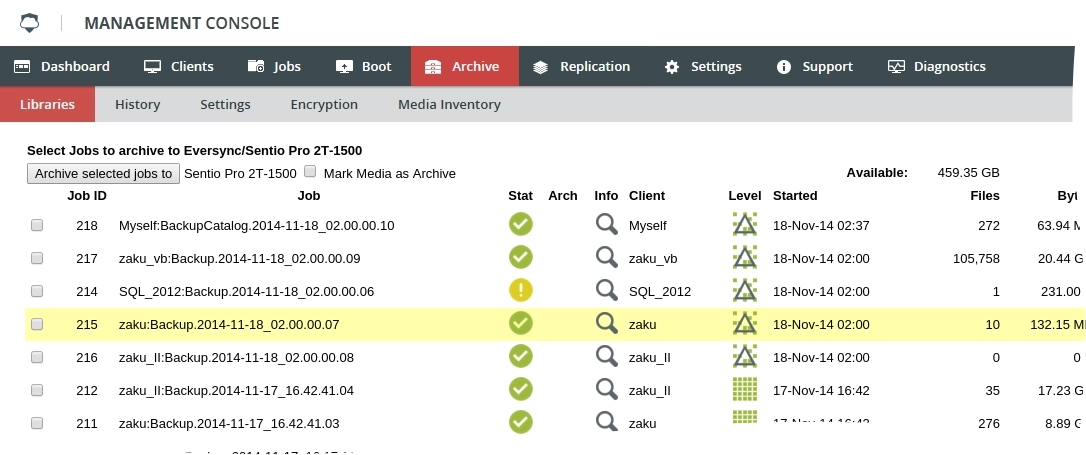
This screen lists all of the successful backup jobs that are available to archive. The list does not include any jobs that have already been archived to the current archive disk. Jobs listed with a check mark in the Arch (archive) column have been archived to different archive disk.
To view information about a backup job, you can click the search icon in the Info column. On the screen that appears, on the Job Messages line.
Select the jobs that you want to archive then click Archive Selected Jobs To to archive the jobs to appliance or the drive listed.
About 4 GB of archive drive space is reserved for building the catalog used to track all the files present in the selected jobs.
The screen that appears lists your selected jobs:
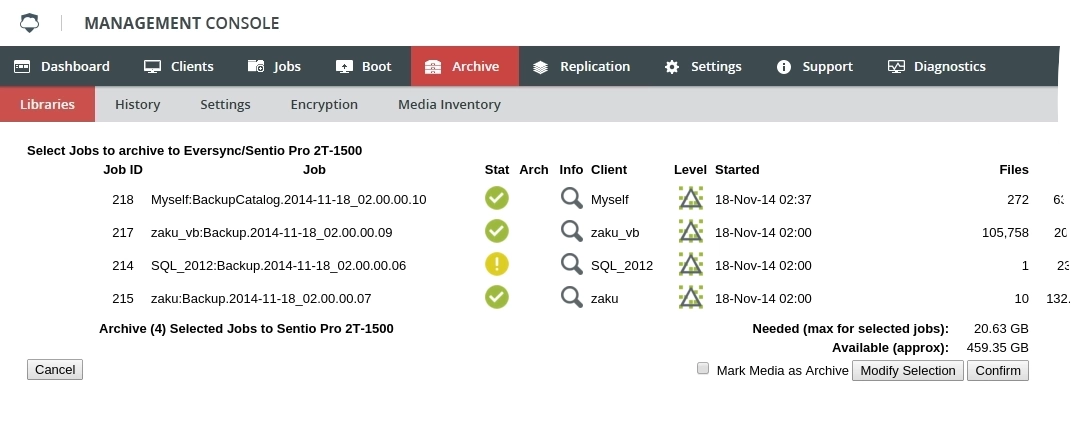
The screen will now have the following options:
| Option | Description |
|---|---|
| Mark Media as Archive | Select to indicate that the associated media should be treated as a non-appendable (READ ONLY) archive by appliance. No additional archiving can be done after this setting is enabled. The drive will need to be formatted to use it as an active archive in the future. |
| Modify Selection | Click to go back to the previous screen to change your selection of jobs to archive |
| Confirm | Click to confirm and start the archive operation |
| Cancel | Click to cancel the archive operation |
If the total size of the selected backup jobs exceeds the capacity of the archive disk, the archiving process will still begin. When the disk is full, the archiving process will stop and you will be prompted to insert new media (needs appendable media). Once a new archive disk is inserted, the archiving process will continue.
The archive disk will generally show that one or two GB are still free, even though it states the disk is full. This is normal as enough empty space needs to be left on the drive to let appliance access it.
After the archive begins, the Archive in Progress screen displays an archive operation in progress:
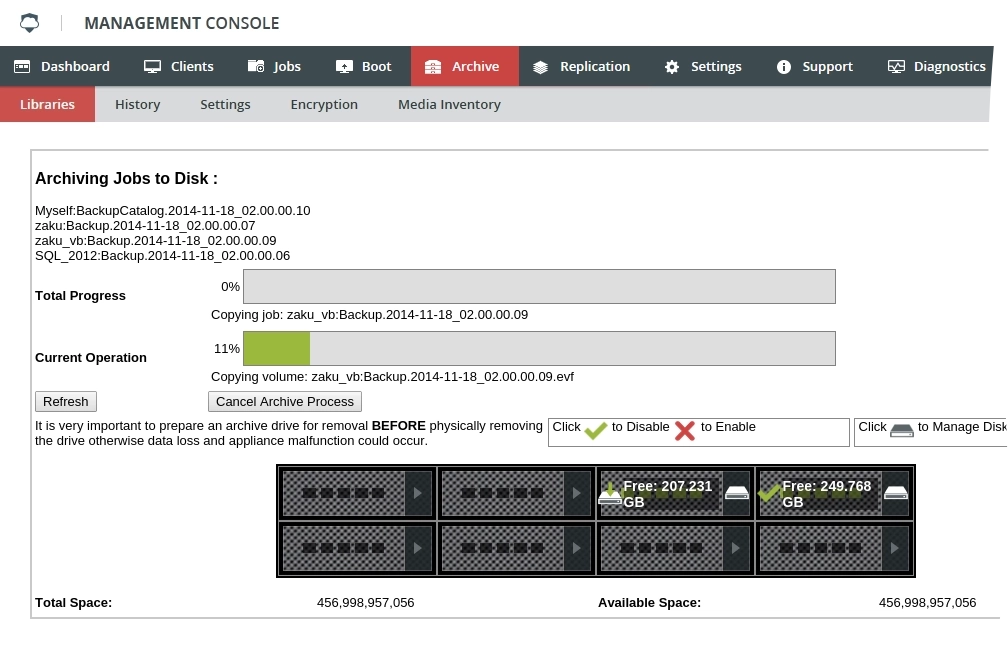
Two progress bars are displayed:
The first bar indicates the percentage complete of the entire archival process.
The second bar indicates the percentage complete of the current operation.
The above figure represents a completed archive job. The listed Archiving Jobs to Disk and progress bar will remain until Clear Archive Process is selected, which will then allow manual archiving of jobs and clients.
During and after the archive, the following buttons appear:
| Button | Description |
|---|---|
| Refresh | Click to refresh the screen display |
| Cancel Archive Process | While the archive is in progress, click this button to issue a cancel request which will terminate the copy at the end of the current operation. The current operation may take some time to complete before the cancel request is recognized. |
| Clear Notice | If the system encounters an error during the archive process that terminates the archive copy process, click to dismiss the error and return appliance to a state where it can be managed |
| Clear Archive Process | After the archive completes, click this button to clear the progress bars from the screen. Until the progress bars are cleared, the manual archive buttons will not be accessible. |
Multiple-disk archives
An archive set can span multiple disks, allowing for large archive sets of many jobs. While archiving such a set, the attached archive disks will run out of free space. When the last archive disk fills, you will be prompted that appendable media is required.
You may also be set up to receive media request email notifications when appendable media is required. This can be configured on the System › System Alerts screen.
To continue archiving the job, you need to replace a currently attached disk with a new disk. To do so:
Click the Libraries subtab and click the button for the library that you are using.
(See Selecting the Archive Library.) Click the Manage Disk icon on the full disk—that is, the icon that shows zero free space.
On the Manage Archive Disk screen, click Prepare Disk for Removal.
When this is completed, the view should change back to the Libraries view. You can then safely remove the full archive disk and replace it with a new one.
Click Scan for Devices for appliance to recognize the new disk, which can take a few moments. New drives must be scanned in, even if there is an archive in progress when the disk is filled and needs to be replaced with a fresh disk.
If the new disk does not appear immediately, click Refresh to check again.
If the disk has never been used by appliance before, it will require a test and format. You can test and format the drive while an archive is requesting appendable media then use it immediately to continue the archive.
When the drive is ready, click the green check mark on the bay/drive graphic, and then click the red X when it appears. The green checkbox will then reappear, and appliance will continue archiving onto the new disk.
If the disk you have selected for archiving has not been used before, it will show as a foreign disk, which will need to be associated with appliance.