Client does not run scheduled backups
Delete erred and canceled jobs
Erred jobs may take up the hidden space if there are 0 bytes showing as saved.
It is always recommended to delete erred jobs unless you are troubleshooting an issue and need them for diagnostics.
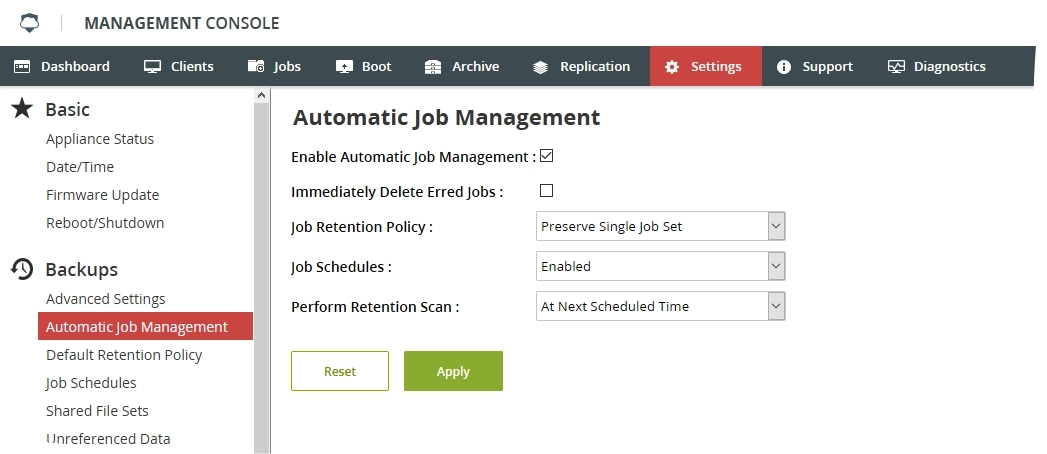
To make Backup & Disaster Recovery appliance automatically delete erred jobs:
In the appliance Management Console, go to Settings.
In the Backups group, click Automatic Job Management.
Select Immediately Delete Erred Jobs, and then click Apply.
You will still see the erred jobs for the first 24–48 hours in Jobs › Recent Jobs.
To delete already existing erred and canceled jobs:
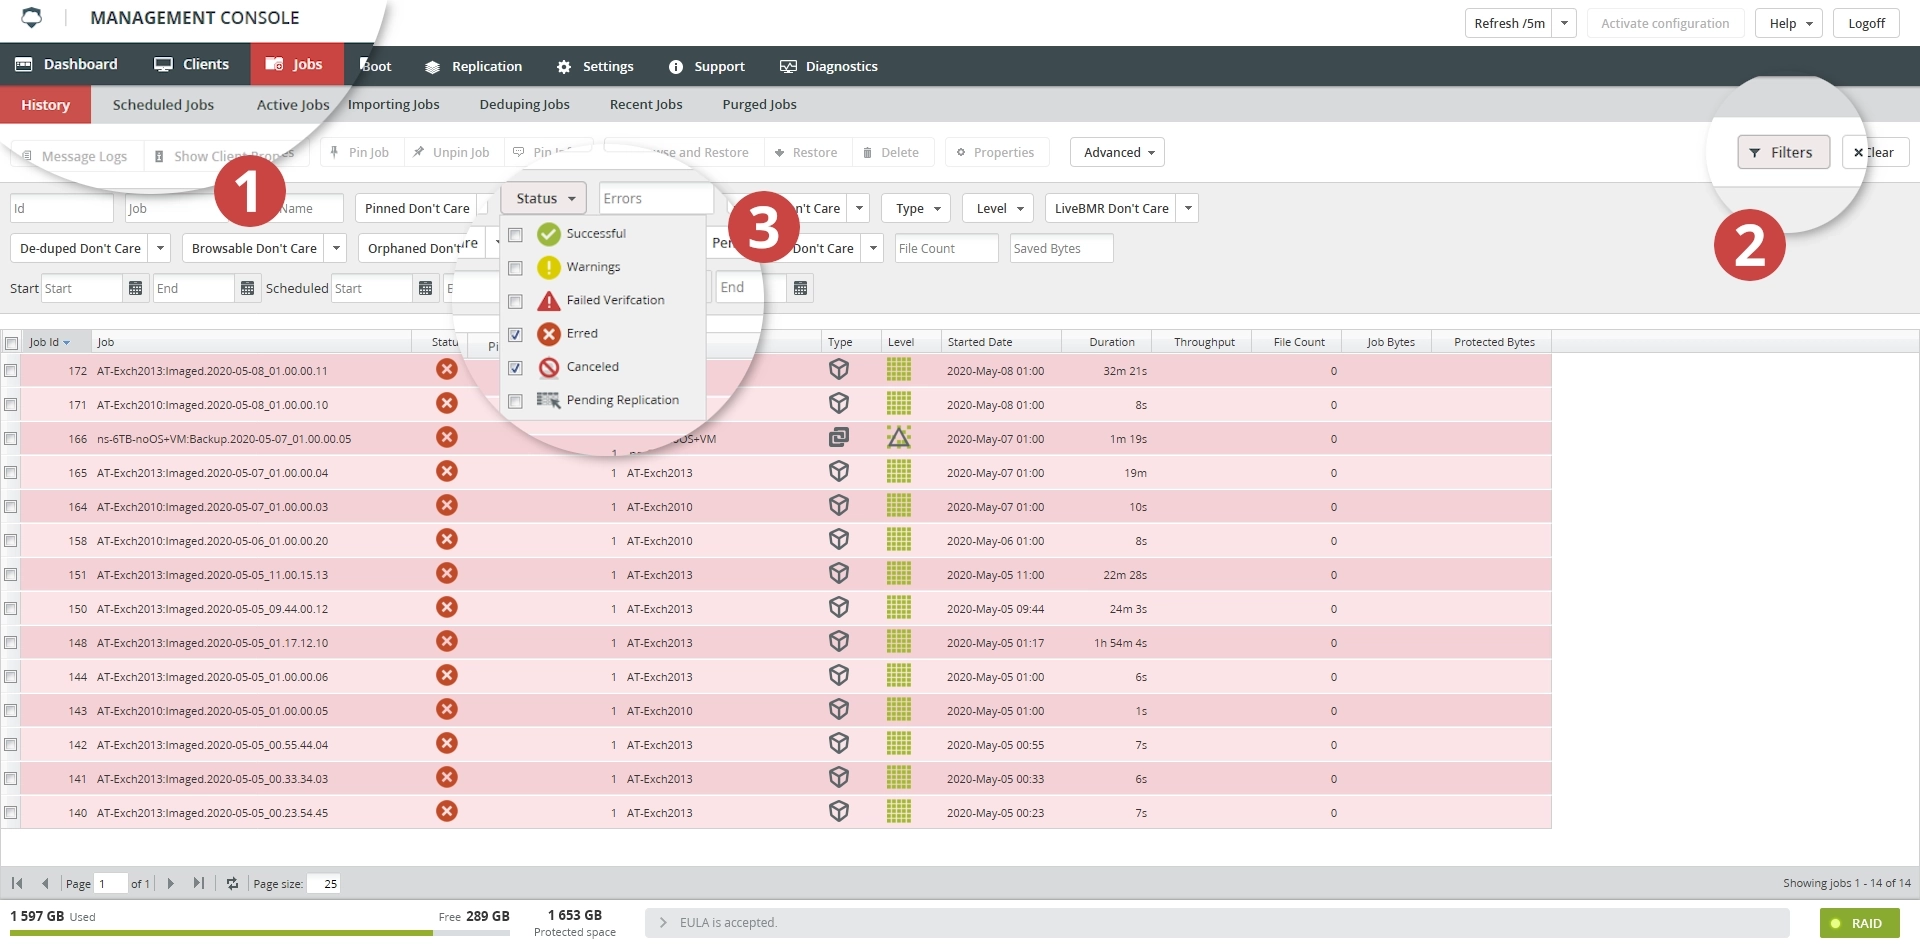
In the appliance Management Console, go to Jobs › History.
Click Filters on the toolbar.
Click Status, clear everything except Erred and Canceled.

Select the jobs you want to delete in the list.
Click Delete on the toolbar, and confirm the deletion of the selected jobs.
Delete non-referenced data
After you delete a job from the appliance, some files related to the job still remain in the system. These files are called the non-referenced data. They take up the disk space, and you can safely remove them if you are running out of space. For this:
In the appliance Management Console, go to Settings.
In the Backups group, click Unreferenced Data.
At the bottom of the list, click Scan For Unreferenced Volumes to find all the non-referenced data.
Select all paths in the list.
Click Delete Selected Volumes, and confirm deletion of the non-referenced data.
Delete jobs manually
If you deleted all erred and canceled jobs, and the non-referenced data, but you still need to free the disk space, you may also delete old or not critical backup jobs.
For this, follow the same steps as for deleting the erred and canceled jobs, but using other status filters.
To avoid any possible data loss, make sure to keep at least the most recent full backup, and any later backups.
Garbage collection
The garbage collection helps you clean the leftover data on the appliance. This data may include, for example, the backup jobs left after you deleted a client, or the old backup jobs removed incompletely.
By default, the garbage collection runs automatically every day at a given time.
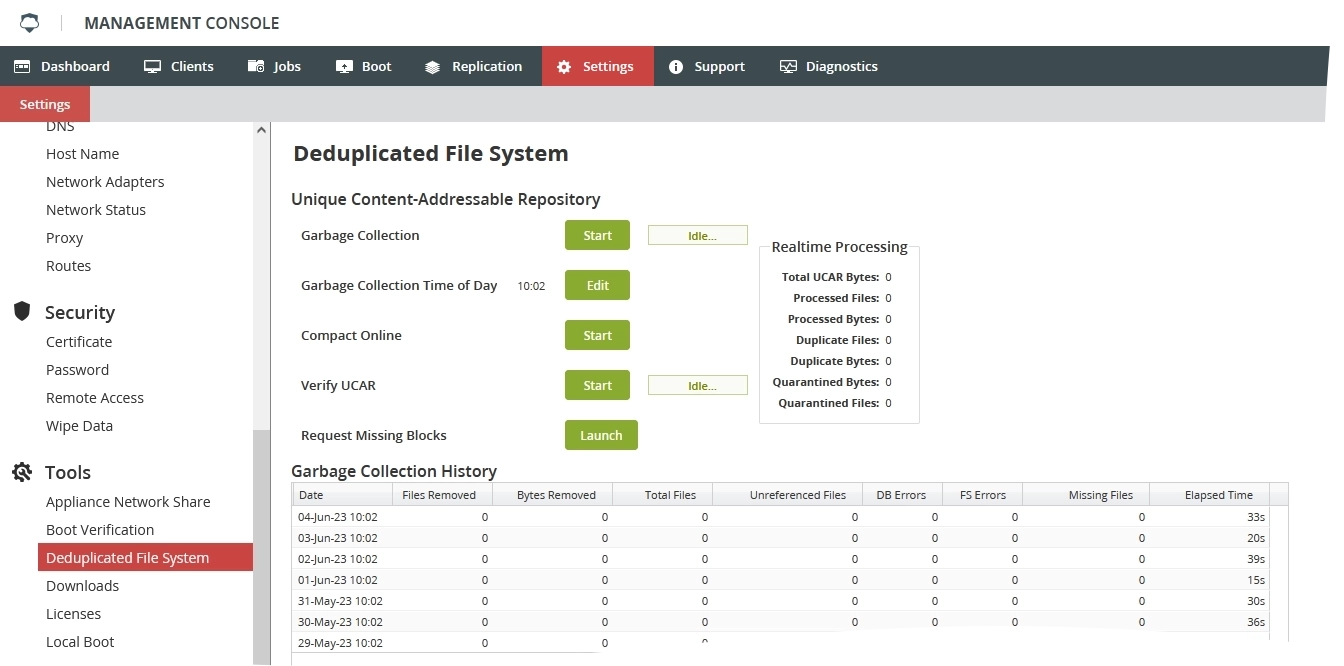
To set time to run the garbage collection, or to start the garbage collection manually, follow these steps:
In the appliance Management Console, go to the Settings tab.
In the Tools group, click Deduplicated File System.
To start the garbage collection manually, click Start next to Garbage Collection.
To set time for automatic garbage collection, click Edit next to Garbage Collection Time of Day.

Garbage collection can take a long time to run, especially if you deleted a lot of data.
Try to run the garbage collection each time after you delete a backup job to make sure the system clears the leftover data completely.
The garbage collection will be deferred for up to 12 hours before it gives up, and will be retried at its regular time. One exception is if the system is running low on space, at which point the garbage collection will proceed if there are jobs deduplicating or not.
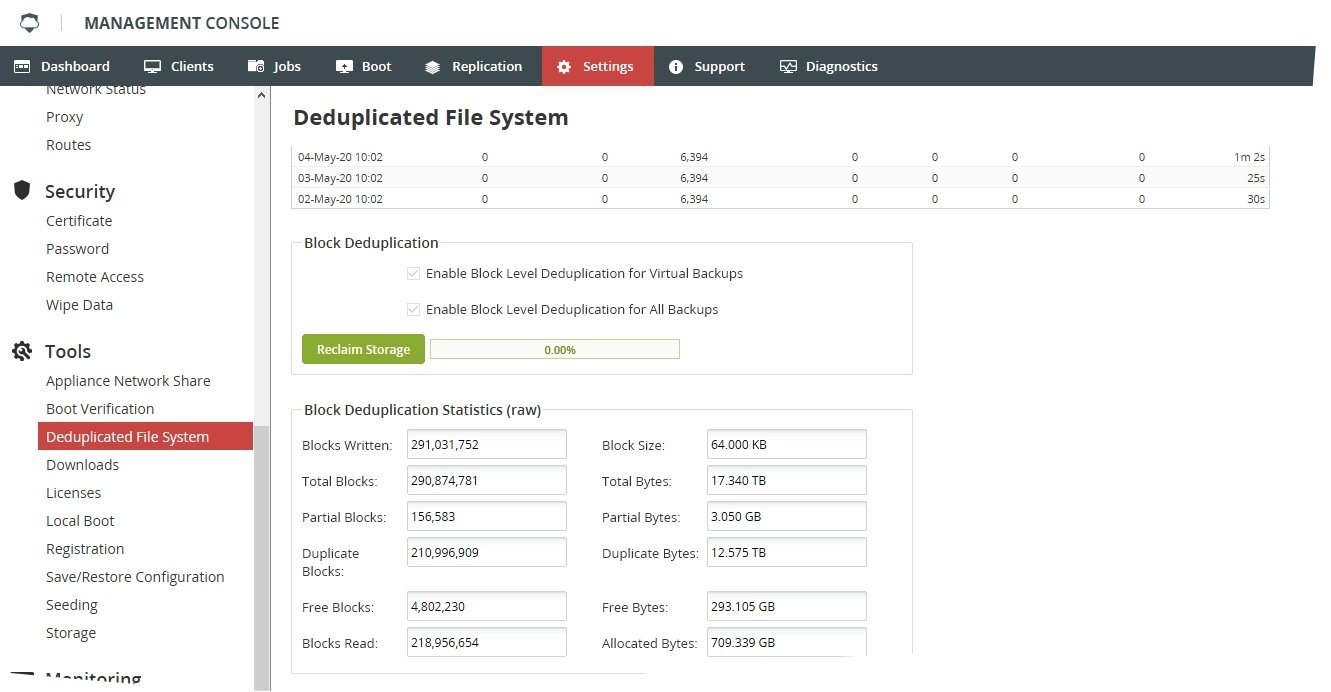
If you have the block level deduplication enabled, the system reserves some space for the block store. Block-level deduplication has its own garbage collection process. To run this process:
In the appliance Management Console, go to the Settings tab.
In the Tools group, click Deduplicated File System.
In the Block Deduplication group, click Reclaim Storage.

Recycle jobs automatically
For long term management of space on the RAID, it is a good idea to set recycling schedules. This lets the appliance to automatically delete jobs once they reach their expiration dates.
All customers using byte-level replication need to use a schedule and retention policy that ensures they have sufficient time for a second full backup to completely replicate over to the secondary before purging the oldest or the original full backup. It is recommended to have a minimum of two full backups on the appliance at a given time; three is preferred.
Best practices for schedules and recycling depend on many things like the size of the backups and your company policies for data backup. It may be a good idea to start on a weekly schedule and see how the backups run from there. If you find that you are running out of space quickly you may need to move to a monthly schedule or another custom schedule that you create. (Unless you are backing up Microsoft Exchange Server, in which case you need to stay on a weekly schedule.)
Recycling can be set to echo the backup schedules:
In Clients › Edit, select a client.
Once you have selected a schedule, you can set up recycling via the Job Recycling section.
Make sure this fits with your selected schedule details (which can be found or created in Settings › Job Schedules).
If you chose the weekly schedule, set the job recycling (full, incremental, and differential backups) to recycle weekly if you want the job immediately cleared off of the RAID, or set them to recycle after a longer period of time if you need them to stay around.
If you chose the monthly schedule and just wanted space cleared as soon as possible, you could have full backups recycle monthly, while incremental and differential backups recycle weekly.
Go to Settings › Backups › Automatic Job Management, and make sure Enable Automatic Job Management is selected.
You can also select Immediately Delete Erred Jobs.
Preserve single job set
It is highly recommended to enable Preserve Single Job Set. For this, go to Settings › Backups › Automatic Job Management, and select Preserve Single Job Set in the Job Retention Policy drop-down list.
This will tell the appliance not to recycle a job until there is a viable replacement. This option is recommended to be sure the most recent full and any subsequent differential or incremental backups remain on the appliance and are not automatically deleted.
But remember that this setting will affect recycling/retention settings until new full is available.
For example, If you have a client with the following settings:
Backup Schedule: Monthly (full backups—on the first Sunday, differential backups—on the second or fifth Sunday, and incremental backups—every Monday–Saturday)
Recycling/Retention:
Full 5 weeks
Diff 1 week
Inc 5 days
Preserve Single Job Set enabled
This is what you will see:
The full and incremental backups will run for the first week.
Expired incremental backups will not be deleted because of the ‘preserve single job set’ setting.
The differential and incremental backups will run for the first week.
Expired incremental backups from the first week will delete because the differential has the needed data collected from the time the full backup was taken.
Expired incremental backups for the second week will not be deleted because of the Preserve Single Job Set setting.
Incremental backups will run for weeks three and four.
Both the expired differential and the expired incremental backups from weeks two, three and four not be deleted because of the Preserve Single Job Set setting.
The full will run the first Sunday of the following month.
At this point, all expired differential and incremental backups from the previous month will be deleted (once they hit their retention/recycling setting).
The more time between full backups on a client, the greater the impact of the Preserve Single Job Set feature.
If you find yourself running out of space because differential and incremental backups are not automatically deleted when their retention settings say they should be, check to see if you have Preserve Single Job Set selected. If this is the case, it is likely that the appliance is working as designed and the backup schedules and retention settings need to be modified. Try a weekly schedule rather than a monthly schedule and set retention settings accordingly. If you need one month’s worth of backups available for restoration but do not seem to have the capacity on the RAID, remember you can also make use of the archiving feature to save the backup jobs for a month off the RAID.
Other space considerations
- Delayed calculation
The storage space calculations shown on the Storage bar on the lower left are automatically performed every 12 hours and cannot be forced.
If space still does not add up, the database is used extensively for the accounting calculations. If the database has errors, the accounting will likely be incorrect. Contact Infrascale Support.
If replication has been suspended due to lack of space on the RAID and does not automatically start up again, please go to Replication › Status on the primary appliance, click Actions, and then select Reconcile Secondary.
The trouble is that space usage is difficult to pin down if there are other processes running in the background (de-duping jobs, importing jobs, or new jobs). Even if all jobs are deleted from the raid the appliance then has to check for non-referenced data, re-calculate space and also run the garbage collector to get an accurate reading (and all of this before the next set of jobs runs). If any jobs were in the process of deduplicating when they were deleted, it can hold up this calculation process (deduplication of backups actually takes almost double the space of the backup while in progress, but can save you space in the long run, after it is done). If garbage collection runs while jobs are completing the importing or de-duping those jobs are not part of the space recalculation and can offset the numbers. If large amounts of data is all deleted at once the appliance has to check itself to make sure that there are not bits and pieces of these jobs left behind (similar to, but not exactly like, when you defragment any other computer system, only the appliance is trying to do this while simultaneously receiving new data). Finally, the only part of the space usage that is set to recalculate more frequently than once per day is the free space, but any of the above scenarios can throw that off.

