
Unpack Backup & Disaster Recovery appliance and its components onto a level surface.
If you have a desktop appliance model, install it where needed, and then start with connecting network cables. Otherwise, mount the appliance in the rack system.
Rack-mounting considerations
Handle the rack-mounting rails with care to prevent internal rails slipping from the outer rails.
Only a trained and qualified technician should install appliance into a rack using the rack-mounting components.
Instructions for mounting the appliance in your rack system are beyond the scope of this guide as your rack system may require special tools. Please refer to the instructions included with your rack system. Appliance itself does not require extra tools for mounting.
Connecting network cables
When connecting appliance to your network, make sure to place it behind the firewall to prevent unauthorized external access.
Connect an Ethernet cable to the RJ45 (eth0) port on your appliance.
Connect the other end of the Ethernet cable to a fast network port with access to all systems you want to protect using the appliance.
See examples of the port layouts below. Positions of the ports may differ depending on the model of your appliance.
Example ports on the rack-mounted model 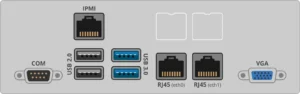
Example ports on the desktop 960 model 
The IPMI port on the rack-mounted models should only be used for console access. It looks similar to the RJ45 port, but serves an entirely different purpose. See details on setting up and configuring IPMI.
Connecting power supply
Connect appliance to a power supply using the power cord included in the package.
If your appliance has redundant power supplies, make sure to connect each power supply before turning the appliance on.