
Checking network settings
To check if Backup & Disaster Recovery appliance automatically configures its network settings to be available online instantly:
Turn the appliance on.
On another computer on the same network as the appliance, open an internet browser, and go to the devices page.
If appliance is on the list, click its name or IP address to go to the Management Console. Skip the steps below, and start with the Quick Start Wizard.
If appliance is not on the list, you have to configure its network settings manually.
Configuring network settings manually
To configure the network settings of the appliance manually:
Connect a monitor and a keyboard to appliance, and turn it on.
Log in to the Console Configuration Utility with the default credentials:
In the Login box, enter
admin.In the Password box, enter
rvxd2d2d.Select Login, and then press Enter.

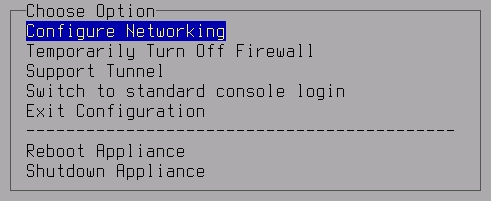
Select Configure Networking, and then press Enter.
In the Short Name box, enter a name, by which the rest of your network devices will refer to appliance.
It can contain only alphanumeric characters and a hyphen (for example,
backup-1). Hyphen cannot be the first or the last character in the name.In the Domain Name box, enter the name of your network domain.
It can contain only alphanumeric characters and a hyphen (for example,
backup.your-domain.com). Hyphen cannot be the first or the last character in the name. It cannot contain two or more dots in a row.In the Default Gateway box, enter the IP address of your router, and then save the changes.
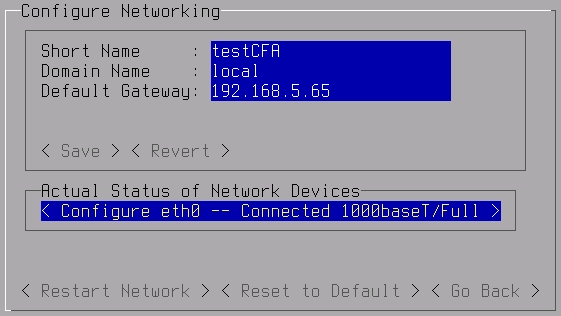
Select Configure eth0, and then press Enter.
In the Configuration list, select Static.
In the IP Address box, enter an IP address for your appliance.
In the Netmask box, enter the netmask of your network.
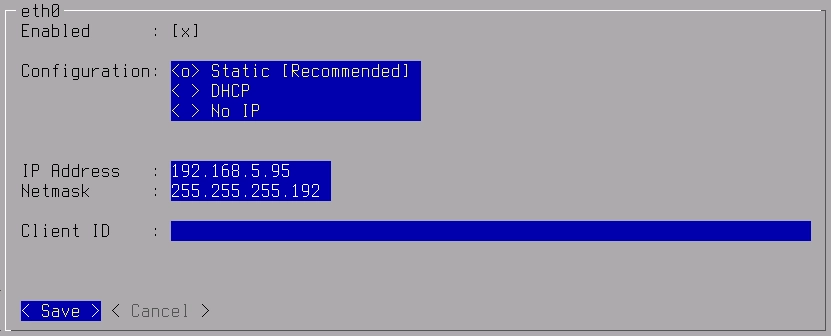
Save the changes and restart appliance.
After restarting appliance:
On another computer on the same network as appliance, open an internet browser, and go to the devices page.
Find your appliance, and then click its name or IP address to go to the Management Console.
Continue with the Quick Start Wizard.